Tuesday, 5 January 2016

Time to get healthy with some salad

Having well and truly indulged over the Christmas and New Year break, I felt it was time to focus on some healthy salad options. Here is a super simple, tasty and nutritious Silverbeet, Capsicum, Carrot and Wholemeal Pasta salad with radish sprouts. I've used my old favourite Green Dressing.


For the last couple of weeks I've been experimenting with growing sprouts; it was last trendy during the '80s and I remember my mother sprouting mung beans when we were children. It's actually very simple and takes no time at all. Just rinse and drain them twice a day and in a few days you have a great salad addition. 


I got the mesh lid and the seeds from Oderings Garden Centre. Obviously the seeds need to be intended for consumption - not heat or chemical treated. I got the Mrs Fothergills sprouting seeds. When they say only put one tablespoons in at a time, they mean it as once those babies start to sprout they quadruple in size! 

Silverbeet, Capsicum, Carrot and Wholemeal Pasta Salad with Radish Sprouts

300g wholemeal penne pasta
2 good handfuls of baby silverbeet leaves - or any other green like spinach or kale.
1 red capsicum
1 yellow capsicum
2 medium carrots
1 cup radish sprouts

1 recipe of Green dressing with half a teaspoon each of ground cumin and ground coriander added. 


Cook the pasta in a large pot with plenty of boiling salted water until it is firm to the bite. Once cooked drain and rinse with cold water. Set aside while preparing the vegetables.


Slice the capsicums into neat sticks. Wash and peel the carrots, then use a peeler to slice them into ribbons. Thoroughly wash and dry the silverbeet leaves, roll them together and slice thinly. Rinse the sprouts. 


Combine all the vegetables and the pasta in a large bowl or dish. Pour in as much dressing as you would like: start with a small amount and add more if required. Toss the salad to combine and serve with whatever protein you might like, we had ours with left over roasted pork!


Happy, and healthy, cooking everyone xx

Saturday, 2 January 2016

Sherry Log for Christmas

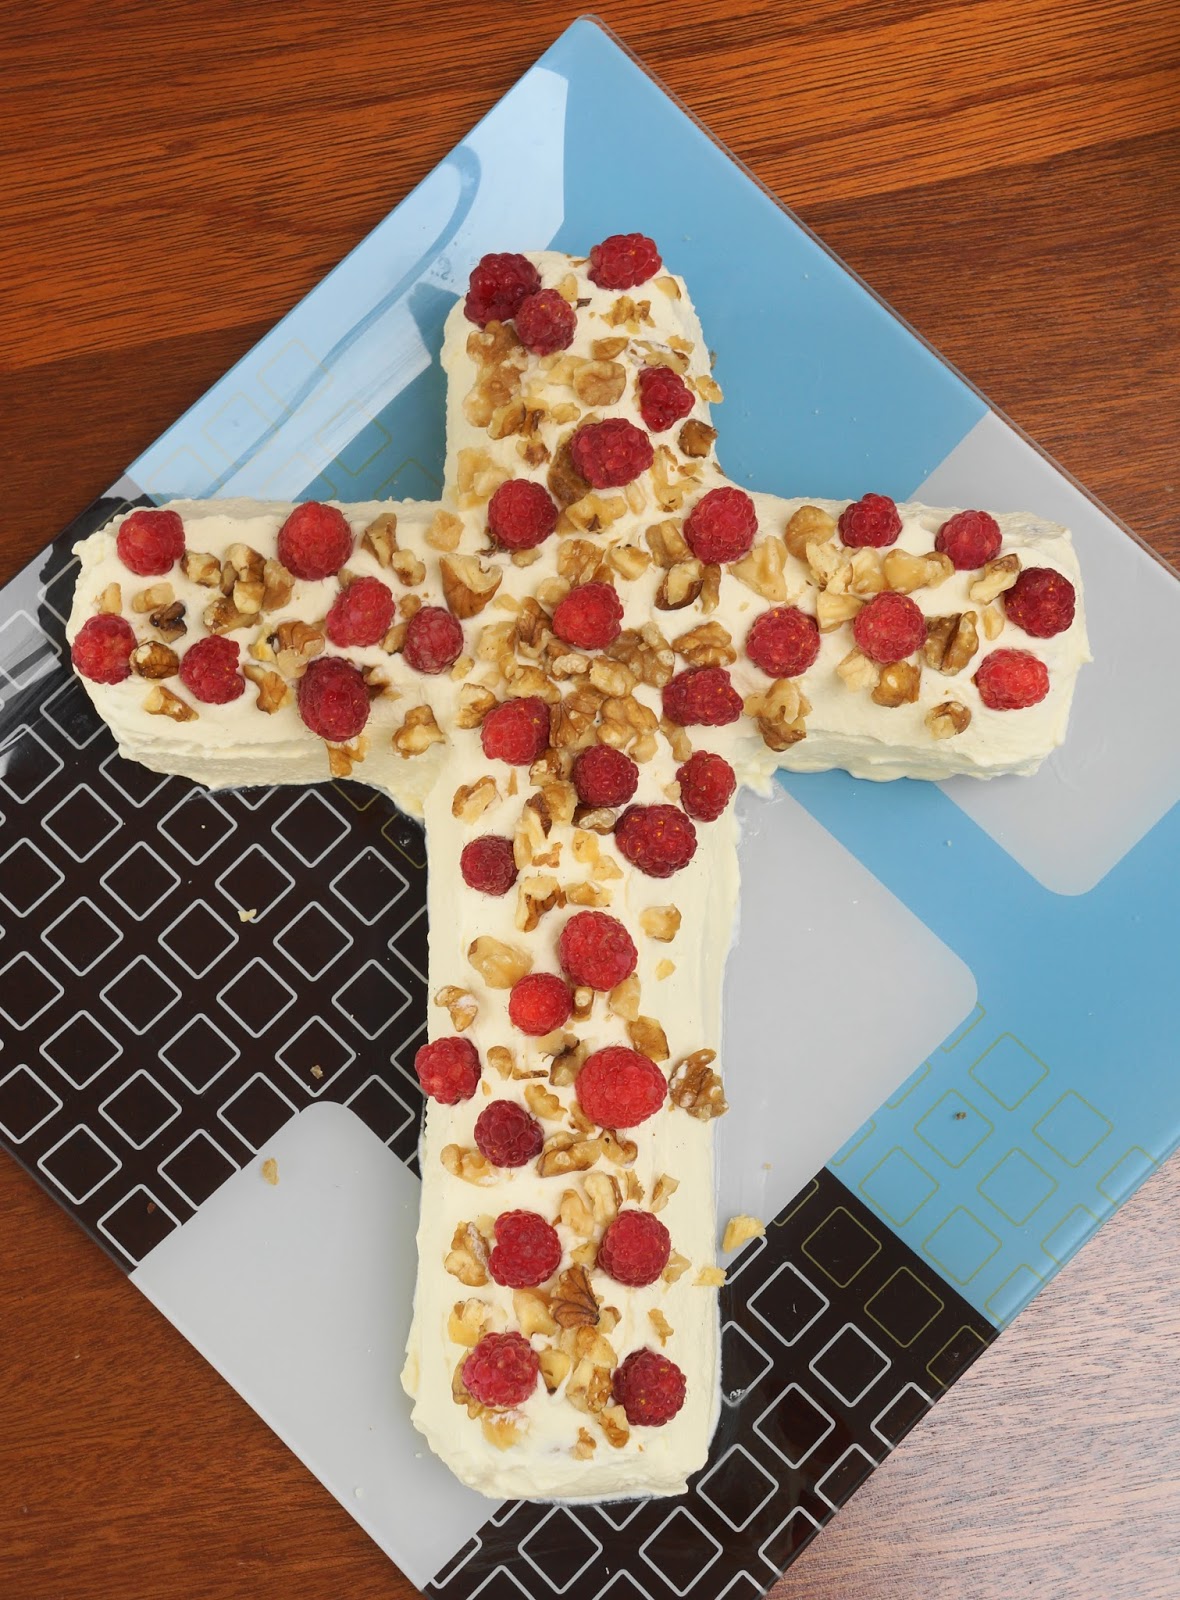
This dessert is a family tradition for all types of occasions and get-togethers. My Grandmother, Mother and Aunties always made it when we were children. My siblings, cousins and I always called it Grog-log, a nickname we were always scalded for using. Over time this nickname took over, and now without our Grandmother to clarify, no one is now quite sure what it was originally called. A kind friend recalls a similar recipe from the '60s called Sherry Log; over the years it has had many incarnations using whichever spirit or liqueur happened to be on hand. I always make a non-alcoholic version using orange juice, for the children and those that prefer it. Given the Christmas season, I've combined the two versions in a cross; vertical for sherry, horizontal for orange juice; but if crosses aren't your thing, a log is the most usual interpretation, or you can get creative and make whatever shape you fancy. 

It's so simple to make, it feels like cheating: more of an assembly than actual cooking, but the outcome is universally well received. The quantities are more or less approximate depending on how much you want to make, how long the biscuits are dunked for, and how much cream is used between each biscuits. I've made a gluten free version before using store bought GF Ginger biscuits. Just make sure your liqueur isn't grain based. 

Sherry Log

one and a half packets of store bought ginger biscuits
2 cups cream
2 to 4 tablespoons of icing sugar according to taste
1 teaspoon vanilla extract
about one cup of sherry or orange juice

Beat the cream until it holds firm peaks. Fold in the icing sugar and vanilla. 


Find a suitable serving tray or platter for the dessert. Place the sherry or orange juice into a small bowl or tray. One at a time, dunk the biscuits into the liquid. 
The alcoholic liquid will quickly soak into the biscuits so don't leave them too long, but the orange juice isn't so absorbent and requires more of a dunking to soften the biscuits.  

I usually make two versions, one alcoholic, one not. Making a cross allows you to combine the two sections and easily be able to determine which is which! 


Place a blob of cream on the plate, and a blob on the first biscuit.


Now stand the biscuits up on the plate using the blobs of cream to hold them. 


Continue to place a blog of cream onto each biscuit before lining it up on the plate.


Keep going until you have the quantity required. 

I put all the sherry biscuits on the upright of the cross.  


Then five orange juice biscuits across the horizontals on each side. 


Now without overworking the cream (or it will curdle) cover the log completely, smoothing out the sides and top. 

Decorate with whatever fruit and nuts you have at hand. I used raspberries and chopped walnuts, but in winter, glace ginger or cherries and slivered almonds works well. Finely grated chocolate is also a good option when fruit is not seasonal. 
Belated Season's Greetings everyone. Maybe I'll make this one again at Easter. 

Nothing says pudding like Pavlova

Christmas has come and gone, and we've been enjoying some lovely time with family. From the better-late-than-never file, here's our Christmas pavlova. I've been working on tweaking the cooking times and temperatures to get a more consistent bake. Pavs can be notoriously tricky to get right, so if yours isn't as pretty as you'd like, rest assured it's nothing that a good slathering of whipped cream and some fruit wont cover. 

Summer Pavlova

6 egg whites
1.5 cups caster sugar
1.5 tablespoons maize cornflour
1 teaspoon vanilla essence
1 tablespoon white vinegar

1.5 cups cream
2 tablespoons icing sugar
1 teaspoon vanilla essence
an assortment of seasonal fruit for decoration


Preheat the oven to 125deg. C and line a baking tray with non-stick baking paper.

In a scrupulously clean beater bowl, beat the egg whites using a whisk attachment until soft peaks form. 


In a bowl, combine the caster sugar and cornflour. 


Add the sugar mix to the whites 3 tablespoons at a time, beating well in between each addition. The mixture will turn silky and shiny as the sugar is added. It should be very thick and stand up in peaks when the beater whisk is raised. Once all the sugar has been incorporated, add the vinegar and vanilla and beat until it is incorporated. 


Using a large spatula, spoon the pavlova mixture onto the lined baking sheet. 

Form it into a nice high round disk shape. 


Place in the oven and bake for 15 minutes at 125deg. C., then turn the oven down to 100deg. and bake a further 1 hour. 


After the hour is up, turn the oven off and leave the pavlova in there to cool. 
Once it's totally cold transfer it to a serving plate. If you don't think it will come off the paper in one piece, leave it on and trim the paper neatly around the edges. 


Whip the cream until thick, then fold in the second measure of icing sugar and vanilla. Spread it on the pavlova and add as much fruit as you would like. 


Here's our Christmas dessert spread: Pavlova, Pineapple Cheesecake, Chocolate Mousse, Raspberry Tiramisu and Sherry Log. 
Have a lovely holiday season with your family and friends xx

Wednesday, 23 December 2015

Christmas Chocolate Mud Cupcakes with Meringue Toffee Frosting Recipe

These cupcakes are a great little treat. They keep well in the fridge and make excellent thank you gifts at this time of year. Our little miss took some to her swimming teachers, some to riding school on the last day, and some to Santa at Ballantynes. The toffee frosting is a lovely light alternative to buttercream. We added strawberries and blueberries to give them a nice cheerful Christmas theme. The cupcakes can easily be made gluten free by using Bakels gluten free flour instead of wheaten flour. 

Chocolate Mud Cupcakes with Meringue Toffee Frosting. 

1/2 cup vegetable oil
250ml cream
50ml espresso
1 cup boiling water
1 teaspoon vanilla essence
2 eggs, beaten

2 cups brown sugar
1 teaspoon salt
2 teaspoons baking soda
2/3 cup cocoa powder
1 and 3/4 cups flour


Preheat the oven to 160 deg. C. Put out 35 small, free-standing cupcake cases onto a baking tray.

Sift the flour and cocoa together and set aside. 
In a large bowl, whisk together the oil, cream, espresso, boiling water, vanilla essence, lightly beaten eggs, brown sugar, salt, and lastly the baking soda. 


Add the flour to the liquid and gradually whisk the mixture to combine it. 

Place the mixture into a jug to make it easier to pour into the cupcake cases.


The cupcakes rise quite a lot, so only half fill each case with mixture.  


Bake for 25 minutes until well risen. The tops should bounce back when pressed. Allow to cool completely before decorating with the toffee frosting.  


Meringue Toffee Frosting

175g granulated sugar
1 tablepoon liquid glucose
40ml water
3 egg whites. 

Separate the eggs. Reserve the egg yolks for another recipe. Beat the egg whites until firm peaks form. Not so much as the whites start to look dry, just stiff enough to stand up when the beater head is raised out of the mixture. 
Put the sugar, glucose and water into a small pot over a medium heat. Stir until the sugar dissolves, then stop stirring and boil until the toffee reaches 145deg. C on the sweet thermometer or until it's a light brown colour. 

With the beater running, dribble the toffee into the beaten egg whites a little at a time. The egg whites will start to look glossy, then turn a nice thick toffee colour. Be very careful with the hot toffee! 


Working quickly before the frosting sets, use a piping bag and star nozzle to pipe rosettes onto each cupcake. If you don't have a bag and nozzle, just use a knife to spread a generous amount onto each one. 

Top each cupcake with a quarter of strawberry and a couple of blueberries. Any summer fruit will do. 

Store the frosted cupcakes in an airtight container in the fridge. 

I got a super cute and practical cupcake holder box from a $2 store in the mall - definitely worth getting for easy transportation.  


Happy baking everyone, and a very merry holiday season to you all xxx 

Monday, 21 December 2015

Summer Fruit and Mascarpone Tart

The sweet taste of the first of the summer soft fruits is one of my highlights of the culinary year. We are feeling quite chuffed to say that most of the fruit for this dessert came from the corner of our garden. This fruit tart is great for a dinner party, as it looks really spectacular, but is easy to make in advance and easy to assemble. I used my usual sweet pastry recipe. This recipe can be just as easily made into smaller individual tarts if required. 

Summer Fruit and Mascarpone Tart
serves six generous portions, or eight smaller


For the tart case:

I used this recipe for short sweet pastry from a previous post. Only half the recipe quantity is required. The reminder can be frozen for use later. 

Preheat the oven to 185deg. C. 

After chilling the pastry, roll it between a sheet of baking paper and a sheet of plastic food wrap. Lift the paper and leave the pastry stuck to the plastic wrap. Now use the plastic wrap to guide the pastry into a long, loose bottomed tart tin. Once in the tin, peel the plastic away and trim the pastry from the edges using a knife. Mend any holes using the off cuts. 


Crumple the previously used sheet of baking paper, then ease it into the tin and over the pastry. Crumpling it first makes the paper easier to handle.  
Now fill the paper lined pastry with either baking rice or beans. 


Bake for 20 minutes then take from the oven and remove the paper and rice. Return to the oven and bake a further 10 minutes until the pastry is very crisp and quite brown. The pastry will have shrunk from the sides of the tin. 


Allow to cool for 10 minutes before removing from the sides of the tin. Leave the base of the tin attached to the tart as this will help to support it. Allow to cool completely before adding the filling. 


For the Filling: 
400g mascarpone 
3 to 4 tablespoons icing sugar
the juice and zest of 1 lemon
1 cup cream
a selection of seasonal fruit, about 3 cups - I used strawberries, raspberries, blueberries, and red and black currents. 

Beat the mascarpone, sugar, lemon zest and juice together until smooth and soft, then set aside. Beat the cream until soft peaks form. Fold the mascarpone into the beaten cream a third at a time. Taste for sweetness, and fold in a little more icing sugar if you require it. 

Store the filling in the fridge until it is required. 


Half an hour before the guests arrive, fill the tart case with the filling. I like to pile it up so it looks nice and generous. You want the case to stay nice and crisp, fill it too soon and it will become soft. 

Any extra filling can be eaten later with whatever left over fruit is available, or use the extra pastry to make a few small tarts to fill. 


Now arrange the seasonal fruit. Hull the strawberries and slice them in half if they are large. Add the raspberries, blueberries, and red and black currents. Don't worry about being exact - it's supposed to look casual. For the Provencal touch, leave the currents on their stalks.


Now use a sieve to dust the whole lot with a generous layer of icing sugar. 

If you don't have a long enough serving dish, just spread out a clean, crisp, cloth serviette and present it straight onto the table. 

You wont need to worry about any leftovers with this tart. 

Happy festive baking xx

Friday, 18 December 2015

Holiday Season Baking - Chocolate Apricot Truffles

Here is the other half of our Christmas gifting to our Little Blossom's Riding teachers. These delicious Chocolate Truffles have featured on here before with cranberries. This time around I've gone for the classic dried apricot addition. 

Chocolate Apricot Truffles

1 cup icing sugar
4 tablespoons cocoa powder
250g sweet biscuit crumbs - I used wine biscuits and crushed them in the food processor
175g butter
125g dark chocolate - I used Whittakers 72% Dark Ghana
half a cup of New Zealand dried apricots

For the chocolate coating you will need an extra 375g dark chocolate - I used the slightly sweeter 50% cocoa Dark Block - and 
2 to 3 tablespoons vegetable oil


Combine the icing sugar, cocoa and crushed biscuit crumbs in a bowl. 

In another bowl melt the chocolate and butter together. I do this by giving it short 10 second bursts in the microwave and stirring well in between. Do this a couple of times until half the chocolate has melted, then just stir until the remaining chocolate is smooth. 


Stir the melted mixture into the dry ingredients and mix well. 


Slice the apricots into small squares and stir into the mixture.


Take spoonfuls, roll into balls and place on a tray or plate ready for chilling. 


While the truffles chill in the fridge, melt the extra chocolate and stir in the oil. Be very careful not to overheat!

Using a large fork, dip each truffle into the melted chocolate, tap off the excess and place on a lined tray. Do not refrigerate or the chocolate will dull. 


Leave them at room temperature to set before either packaging in cellophane or placing in an airtight container. 

These truffles also keep well and are perfect for keeping on standby for Christmas time guests.


All packaged and ready to be gifted. Happy festive baking xx

Thursday, 17 December 2015

Are you dreaming of a (gluten free) White Christmas?

Here's an old Christmas favourite that is super easy to make, stores well, and can be whipped out in a moments notice when unexpected guests arrive. It also makes an excellent little home-made gift. Nothing says thank you like the time spent making a home baked gift.

Our Little Miss gave the White Christmas, some Chocolate Apricot Truffles and a few little gifts to all the lovely teachers and staff at Riding school. 

White Christmas Slice

1.5 cups rice bubbles - I used gluten free
1 cup whole milk powder
1 cup icing sugar
1 cup desiccated long thread coconut
half a cup red glace cherries
half a cup green glace cherries
half a cup dried cranberries
250g white vegetable shortening - I used Kremelta brand

Line a shallow 25 x 18cm - or similar size - slice tin with baking paper.

Put the rice bubbles, milk powder, icing sugar, coconut, chopped cherries and cranberries. 


Either in the microwave, or over a double boiler, gently melt the vegetable fat. Be very careful not to over heat it. A couple of 10 second bursts in the microwave followed by stirring until the last lumps melt is the ideal method. 

Stir the melted fat into the dry ingredients and fruit. 


Press the mixture into the lined tin, cover and place in the fridge until set. Allow it to come up to room temperature before cutting into petite squares. 


I packaged ours in cellophane bags ready to be parceled up with the other gifts. I used cute stickers to seal the bags.