I've made some cute new little Fox cushions! These ones are juveniles, and three-quarters the size of the originals.
These little foxes are looking for a new home. So if you would like to adopt one, they are waiting for you at Where the Fox Lives at The Tannery in Woolston, Christchurch.
In an effort to make more of the everyday things I bake more nutritious I've been substituting in wholemeal ingredients along with added nuts and seeds where I can. Wholemeal flour adds a new dimension to baked goods with its nutty flavour and added bite. One of my other favourite additions is chia seeds. Chia is versatile, tasty and easily added to so many recipes for an instant protein, texture and flavour boost. Here's my new take on the Chocolate Chip Biscuit. The children will hardly even notice they are healthier. This recipe makes a good double tray of biscuits, so there will be plenty to share around.
Wholemeal and Chia Chocolate Chip Biscuits
200g butter
150g brown sugar
300g wholemeal flour
2 teaspoons baking powder
1 cup chocolate chips
3 tablespoons chis seeds
Preheat the oven to 175deg. C and line a large baking tray.

Beat the butter and sugar together until pale and creamy.

Add the wholemeal flour, baking powder, chocolate chips and chia seeds and stir to combine.

The mixture will appear crumbly, but should hold together when pressed.
 Press and roll tablespoon lots into balls and arrange on the lined tray.
Flatten each ball, then bake for 10 to 12 minutes.
Allow to cool on the tray as the biscuits will be very soft straight from the oven.
The next time you have guests coming around, try serving this healthy and tasty Pea, Mint and White Bean Hummus. It's delicious, super easy to make and great for the summer season when peas are plentiful and fresh. Having said that, this dip is just as easily made from frozen peas. An oversupply of cooked peas left over from Christmas lunch first inspired this recipe.
Green Pea, Mint and White Bean Hummus
3 cups cooked peas
2 cloves garlic
the juice of 2 lemons
a 390g can of butter beans
a handful of mint leaves
two thirds of a cup of olive oil
a teaspoon of salt
ground pepper
 Drain the can of white beans and wash them well under cold running water. Shake off the excess water and leave to drain while gathering the other ingredients.
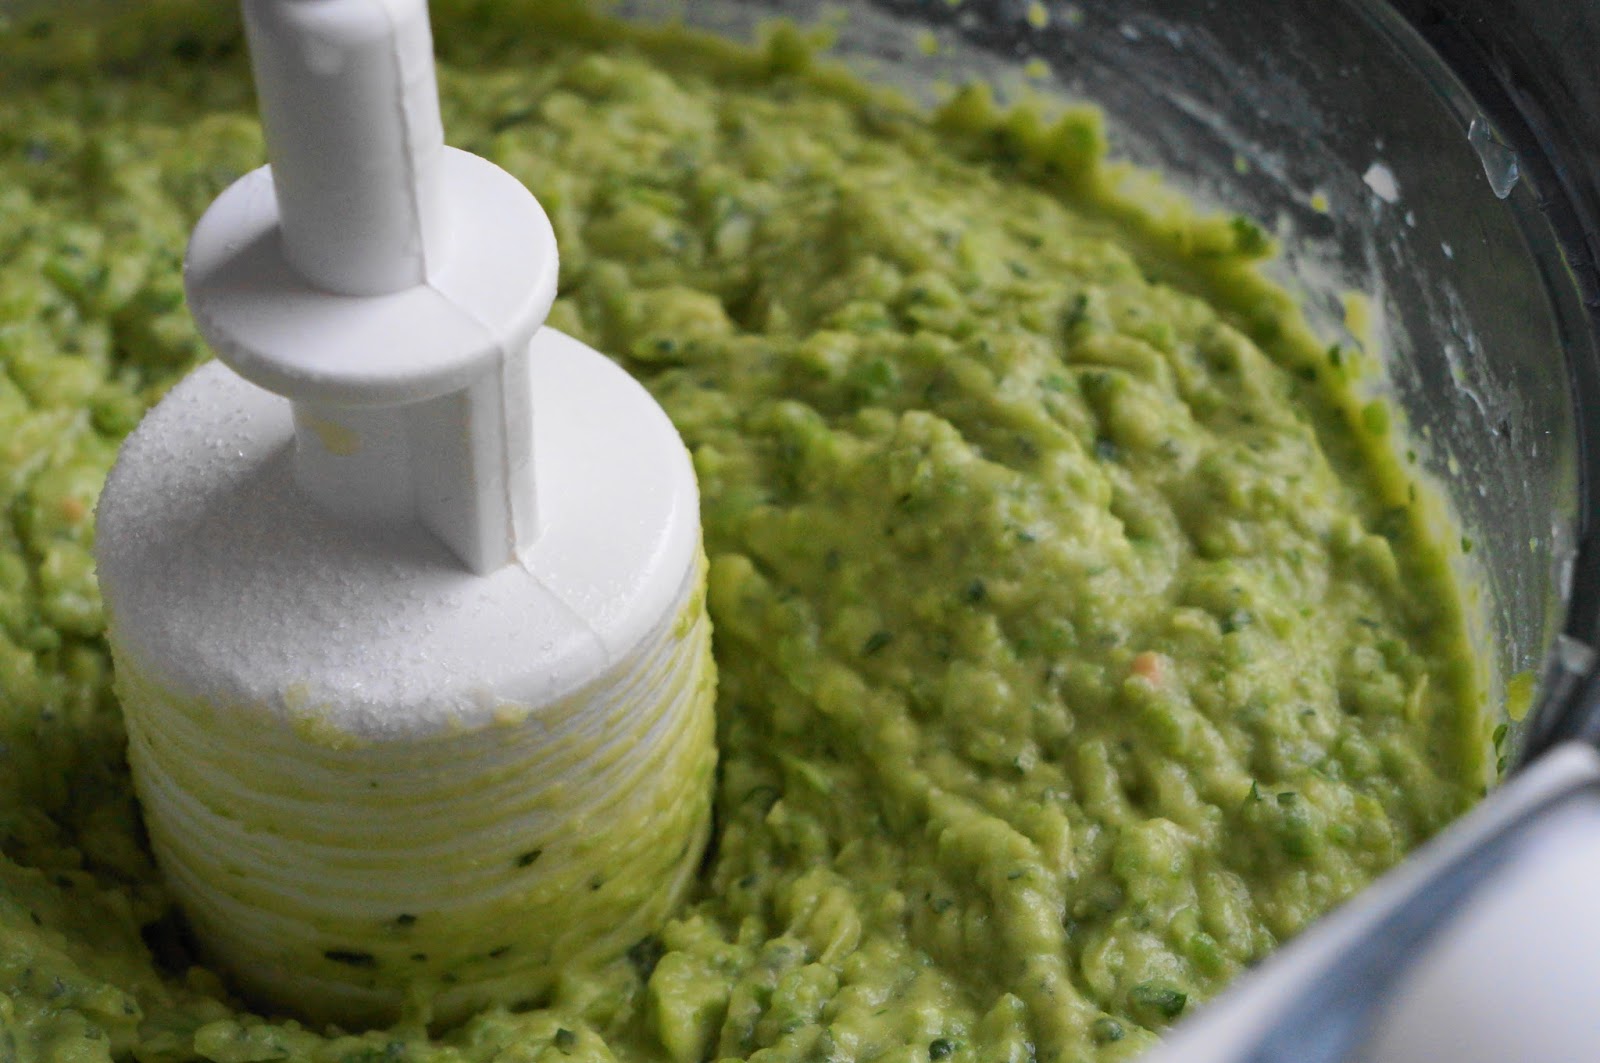
Place the beans, peeled garlic cloves, 2 cups of the peas, the mint leaves and the lemon juice into a large food processor.
Add half the olive oil and process. Keep adding the remaining oil until a smooth, soft consistency is achieved.
Now add the remaining cup of peas and the salt and pepper. Process briefly, the aim is to retain some bigger pea chunks in order to give the spread more texture.
Check the seasoning and adjust as required.
 Transfer the spread to a serving dish and drizzle with a little more olive oil before serving with crackers, lovely sliced french bread or a selection of sliced vege sticks.
The spread will keep for a few days in a sealed container in the fridge.
Eat it in the morning on a lovely piece of toasted wholemeal bread.
Happy cooking xxx
We've been enjoying a few days at the farm. The weather has been nice and there's been time to poke around the garden for things to cook with. Given the slower start to the growing season up in the high country, and being the resourceful soul I like to think I am, I've been plucking small leaves from the gone-to-seed silverbeet and using them for salads. Silverbeet is such an underrated vege. I think, as small children, many of us have been a bit put off silverbeet by being fed too many well overcooked examples at our grandmother's table: something we ate out of duty, before woofing down the roast meat and looking forward to pudding. Not only is it super tasty served raw, but it grows very easily in the garden throughout the year; it's hardy enough to withstand the hardest frost, and quickly perks up when the weather warms up.
The other interesting component of this salad is the buckwheat. Buckwheat is actually no relation of wheat. It belongs to the rhubarb family and unlike wheat, contain no gluten at all. It's starchy and nutty, quick to cook, and makes a great carbohydrate addition to any salad. I've again taken advantage of all the parsley in the garden and dressed the salad with my favourite Green Dressing. If you want to make the dressing gluten free, use wine vinegar instead of malt.
Buckwheat and Silverbeet Salad with Green Dressing
1 cup uncooked buckwheat
3 to 4 good handfuls of small silverbeet leaves
1 red capsicum
2 spring onions
1 recipe of Green Dressing with a half teaspoon of ground cumin added.
 Rinse the buckwheat in plenty of cold water. Place it and 3 cups of water into a large pot and bring to the boil.
Turn down and cook, covered for 15 to 20 minutes. Try a couple of grains, they should be soft in the middle, but not mushy.
Drain the buckwheat, then set aside to cool while you prepare the remaining ingredients.
Thoroughly wash and dry the silverbeet.
Roll it together and slice thinly.
Slice the capsicum into small strips, then into small dice.
Finely slice the spring onions.
Prepare the dressing - you wont need to whole amount - the unused portion will keep for at least a week in the fridge.
 Fluff the buckwheat with a fork, then place all the ingredients into a bowl and combine with as much dressing as you might like. The buckwheat soaks up quite a lot of dressing, so don't be shy about adding more if required.
Happy, and healthy cooking everyone xx
Having well and truly indulged over the Christmas and New Year break, I felt it was time to focus on some healthy salad options. Here is a super simple, tasty and nutritious Silverbeet, Capsicum, Carrot and Wholemeal Pasta salad with radish sprouts. I've used my old favourite Green Dressing.
 For the last couple of weeks I've been experimenting with growing sprouts; it was last trendy during the '80s and I remember my mother sprouting mung beans when we were children. It's actually very simple and takes no time at all. Just rinse and drain them twice a day and in a few days you have a great salad addition.
I got the mesh lid and the seeds from Oderings Garden Centre. Obviously the seeds need to be intended for consumption - not heat or chemical treated. I got the Mrs Fothergills sprouting seeds. When they say only put one tablespoons in at a time, they mean it as once those babies start to sprout they quadruple in size!
Silverbeet, Capsicum, Carrot and Wholemeal Pasta Salad with Radish Sprouts
300g wholemeal penne pasta
2 good handfuls of baby silverbeet leaves - or any other green like spinach or kale.
1 red capsicum
 1 yellow capsicum
2 medium carrots
1 cup radish sprouts
1 yellow capsicum
2 medium carrots
1 cup radish sprouts
1 recipe of Green dressing with half a teaspoon each of ground cumin and ground coriander added.
Cook the pasta in a large pot with plenty of boiling salted water until it is firm to the bite. Once cooked drain and rinse with cold water. Set aside while preparing the vegetables.
Slice the capsicums into neat sticks. Wash and peel the carrots, then use a peeler to slice them into ribbons. Thoroughly wash and dry the silverbeet leaves, roll them together and slice thinly. Rinse the sprouts.
Combine all the vegetables and the pasta in a large bowl or dish. Pour in as much dressing as you would like: start with a small amount and add more if required. Toss the salad to combine and serve with whatever protein you might like, we had ours with left over roasted pork!
Happy, and healthy, cooking everyone xx
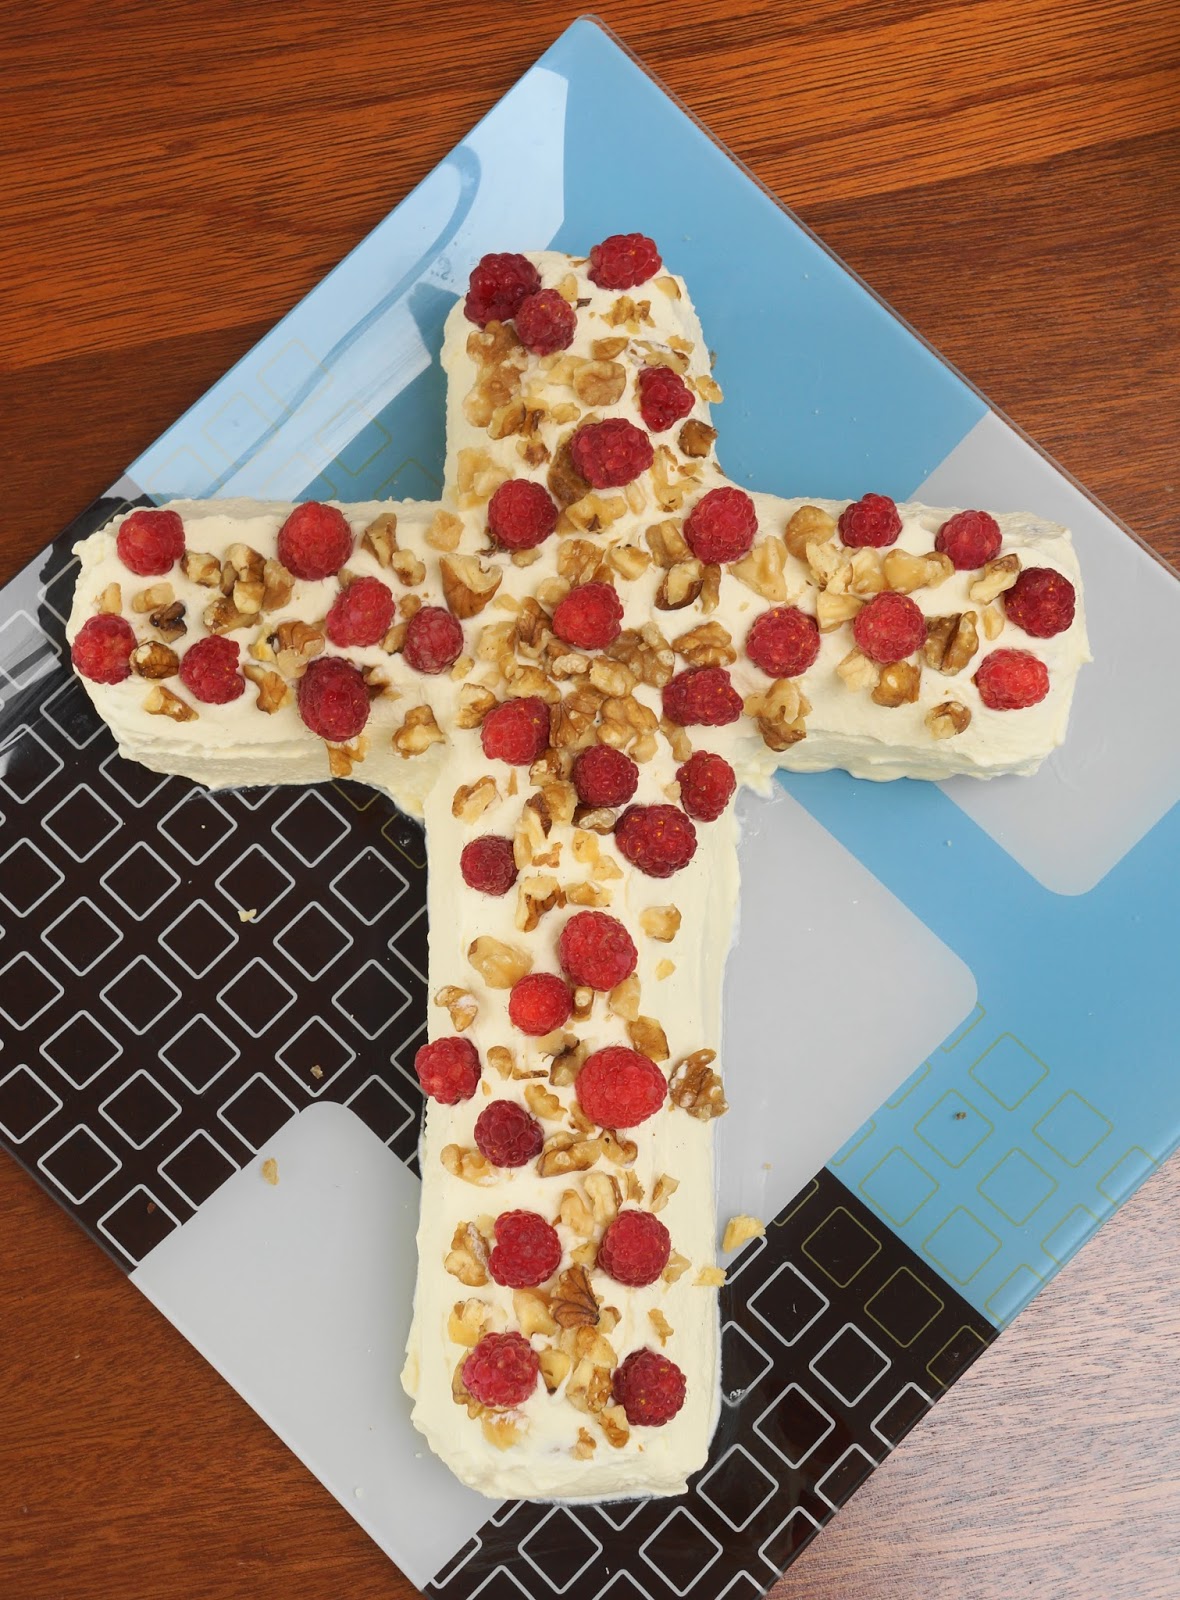
This dessert is a family tradition for all types of occasions and get-togethers. My Grandmother, Mother and Aunties always made it when we were children. My siblings, cousins and I always called it Grog-log, a nickname we were always scalded for using. Over time this nickname took over, and now without our Grandmother to clarify, no one is now quite sure what it was originally called. A kind friend recalls a similar recipe from the '60s called Sherry Log; over the years it has had many incarnations using whichever spirit or liqueur happened to be on hand. I always make a non-alcoholic version using orange juice, for the children and those that prefer it. Given the Christmas season, I've combined the two versions in a cross; vertical for sherry, horizontal for orange juice; but if crosses aren't your thing, a log is the most usual interpretation, or you can get creative and make whatever shape you fancy.
It's so simple to make, it feels like cheating: more of an assembly than actual cooking, but the outcome is universally well received. The quantities are more or less approximate depending on how much you want to make, how long the biscuits are dunked for, and how much cream is used between each biscuits. I've made a gluten free version before using store bought GF Ginger biscuits. Just make sure your liqueur isn't grain based.
Sherry Log
one and a half packets of store bought ginger biscuits
2 cups cream
2 to 4 tablespoons of icing sugar according to taste
1 teaspoon vanilla extract
about one cup of sherry or orange juice
 Beat the cream until it holds firm peaks. Fold in the icing sugar and vanilla.
 Find a suitable serving tray or platter for the dessert. Place the sherry or orange juice into a small bowl or tray. One at a time, dunk the biscuits into the liquid.
The alcoholic liquid will quickly soak into the biscuits so don't leave them too long, but the orange juice isn't so absorbent and requires more of a dunking to soften the biscuits.
Find a suitable serving tray or platter for the dessert. Place the sherry or orange juice into a small bowl or tray. One at a time, dunk the biscuits into the liquid.
The alcoholic liquid will quickly soak into the biscuits so don't leave them too long, but the orange juice isn't so absorbent and requires more of a dunking to soften the biscuits.
I usually make two versions, one alcoholic, one not. Making a cross allows you to combine the two sections and easily be able to determine which is which!
 Place a blob of cream on the plate, and a blob on the first biscuit.
 Now stand the biscuits up on the plate using the blobs of cream to hold them.
 Continue to place a blog of cream onto each biscuit before lining it up on the plate.
Keep going until you have the quantity required.
I put all the sherry biscuits on the upright of the cross.
Then five orange juice biscuits across the horizontals on each side.
Now without overworking the cream (or it will curdle) cover the log completely, smoothing out the sides and top.
Decorate with whatever fruit and nuts you have at hand. I used raspberries and chopped walnuts, but in winter, glace ginger or cherries and slivered almonds works well. Finely grated chocolate is also a good option when fruit is not seasonal.
Belated Season's Greetings everyone. Maybe I'll make this one again at Easter.
Christmas has come and gone, and we've been enjoying some lovely time with family. From the better-late-than-never file, here's our Christmas pavlova. I've been working on tweaking the cooking times and temperatures to get a more consistent bake. Pavs can be notoriously tricky to get right, so if yours isn't as pretty as you'd like, rest assured it's nothing that a good slathering of whipped cream and some fruit wont cover.
Summer Pavlova
6 egg whites
1.5 cups caster sugar
1.5 tablespoons maize cornflour
1 teaspoon vanilla essence
1 tablespoon white vinegar
1.5 cups cream
2 tablespoons icing sugar
1 teaspoon vanilla essence
an assortment of seasonal fruit for decoration

Preheat the oven to 125deg. C and line a baking tray with non-stick baking paper.
In a scrupulously clean beater bowl, beat the egg whites using a whisk attachment until soft peaks form.
 In a bowl, combine the caster sugar and cornflour.
 Add the sugar mix to the whites 3 tablespoons at a time, beating well in between each addition. The mixture will turn silky and shiny as the sugar is added. It should be very thick and stand up in peaks when the beater whisk is raised. Once all the sugar has been incorporated, add the vinegar and vanilla and beat until it is incorporated.
 Using a large spatula, spoon the pavlova mixture onto the lined baking sheet.
Form it into a nice high round disk shape.
 Place in the oven and bake for 15 minutes at 125deg. C., then turn the oven down to 100deg. and bake a further 1 hour.
 After the hour is up, turn the oven off and leave the pavlova in there to cool.
Once it's totally cold transfer it to a serving plate. If you don't think it will come off the paper in one piece, leave it on and trim the paper neatly around the edges.
After the hour is up, turn the oven off and leave the pavlova in there to cool.
Once it's totally cold transfer it to a serving plate. If you don't think it will come off the paper in one piece, leave it on and trim the paper neatly around the edges.
Whip the cream until thick, then fold in the second measure of icing sugar and vanilla. Spread it on the pavlova and add as much fruit as you would like.
Here's our Christmas dessert spread: Pavlova, Pineapple Cheesecake, Chocolate Mousse, Raspberry Tiramisu and Sherry Log.
Have a lovely holiday season with your family and friends xx


 Press and roll tablespoon lots into balls and arrange on the lined tray.


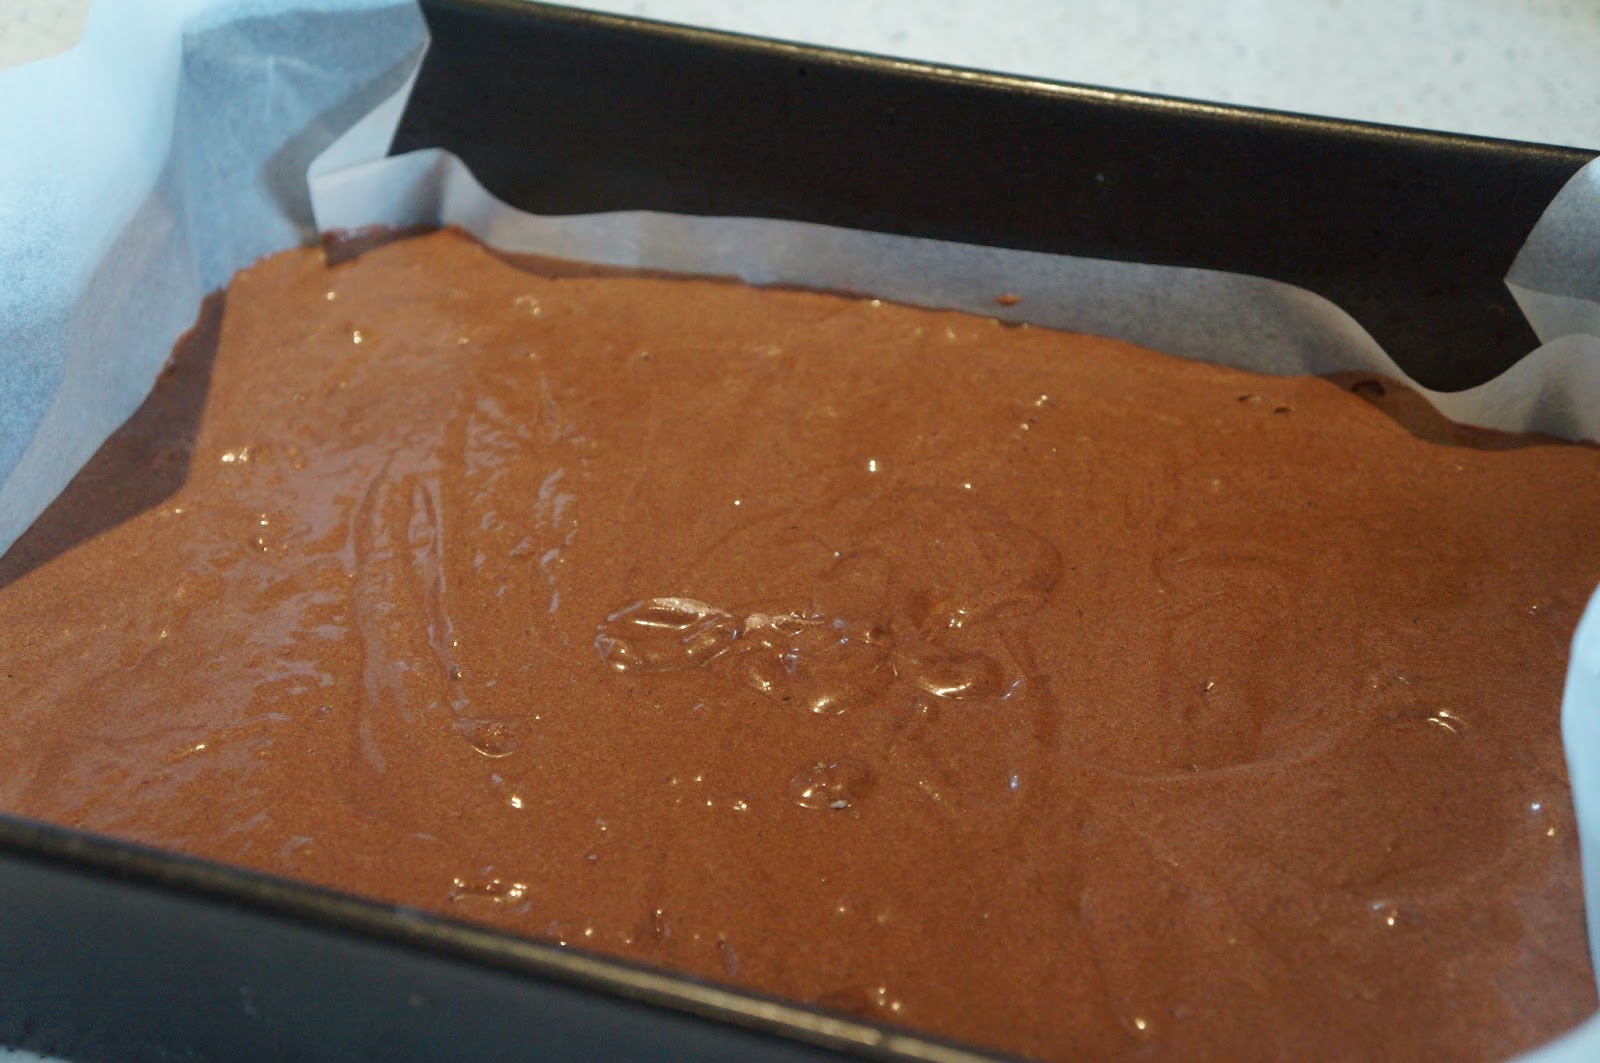 Pour the sponge mixture into the prepared baking tin.
  Bake for 25 to 30 minutes until the sponge is well risen and bounces back when pressed.


 Drain the can of white beans and wash them well under cold running water. Shake off the excess water and leave to drain while gathering the other ingredients.

 Transfer the spread to a serving dish and drizzle with a little more olive oil before serving with crackers, lovely sliced french bread or a selection of sliced vege sticks.
 Rinse the buckwheat in plenty of cold water. Place it and 3 cups of water into a large pot and bring to the boil.

 Fluff the buckwheat with a fork, then place all the ingredients into a bowl and combine with as much dressing as you might like. The buckwheat soaks up quite a lot of dressing, so don't be shy about adding more if required.

 For the last couple of weeks I've been experimenting with growing sprouts; it was last trendy during the '80s and I remember my mother sprouting mung beans when we were children. It's actually very simple and takes no time at all. Just rinse and drain them twice a day and in a few days you have a great salad addition.
  1 yellow capsicum


 Beat the cream until it holds firm peaks. Fold in the icing sugar and vanilla.
  Find a suitable serving tray or platter for the dessert. Place the sherry or orange juice into a small bowl or tray. One at a time, dunk the biscuits into the liquid.
  Place a blob of cream on the plate, and a blob on the first biscuit.
 Now stand the biscuits up on the plate using the blobs of cream to hold them.
  Continue to place a blog of cream onto each biscuit before lining it up on the plate.


 Add the sugar mix to the whites 3 tablespoons at a time, beating well in between each addition. The mixture will turn silky and shiny as the sugar is added. It should be very thick and stand up in peaks when the beater whisk is raised. Once all the sugar has been incorporated, add the vinegar and vanilla and beat until it is incorporated.
  Using a large spatula, spoon the pavlova mixture onto the lined baking sheet.
  Place in the oven and bake for 15 minutes at 125deg. C., then turn the oven down to 100deg. and bake a further 1 hour.
  After the hour is up, turn the oven off and leave the pavlova in there to cool.