Still on the subject of previously unfinished projects, I was very happy to wear my latest creation out and about today. This ones been lingering unfinished in the cupboard for quite some time now. The pattern was originally made by me using a basic pattern block and adapting it to incorporate the wide shaped band and gathers.
The skirt's made in 3 parts with an invisible zip in the centre back. The band is really simple to make as it is faced with an identical set of fabric panels. All that is required is to gather the skirt into the band before sewing the side seams together. I found some perfectly matching red cotton tape and sewed it down each side seam to add a bit of contrast to the busy plaid pattern.
I didn't line the skirt as the fabric is thick enough to stand on its own.
Today I am wearing my skirt with a vintage Charmaine Reveley top. The weather obliged us today and it was lovely to enjoy a sunny summer's day together.
With all this time for cooking, things have been a little quiet on the craft blog front in the last month or so. Christmas breaks being such a great time to have a tidy out, I've been attending to a few unfinished projects - both knitted and sewn.
This cute little duck skirt is the first to get an airing, I started it so long ago I can't find the pattern I based it on. It was vintage, I can remember that much. I took it to school to show the girls how to sew the pleats and the invisible zip in. They named it 'the pukeko skirt', but I still think they look like ducks with their little short legs.
It's made in six panels with the pleats added later to get the correct fit. I put the invisible zip on the side to avoid having the split the centre back panel in half. The original pattern did not have a lining, so I cut one using the shape of pleated front and back panels and sewed it to the outside layer before attaching the waistband.
I have teamed it with a label-less op shopped top and suede Django and Juliette sling backs.
All I need now is some more summer weather.
Today I made this gorgeous Gooseberry Jam. It looked so marvelous in the jars that I just had to share it with you. I am always amazed at the lovely pink colour that comes out of all those little green beauties.
I followed the tried and true formula of equal parts of fruit and sugar. This is 1 kg of raw topped and tailed gooseberries: cooked until they breakup, and 1 kg of sugar: dissolved in the fruit and boiled until it sets.
I checked the setting by using a sweet thermometer to check that the jam reaches 106 deg. C, and by putting a teaspoon of jam on a plate and into the freezer: if a skin forms on the top then the jam is ready. Put the hot jam into sterilized jars, lids on, and your a domestic goddess already.
This is the smaller batch of raspberry jam I made earlier in the week. We have really enjoyed some great raspberry picking this season. All I need now is a few days of sun for the strawberries to ripen, and my season's jam making will be done.
It's supposed to be summer, but today's rain and chilly weather would have most of us think otherwise. As a general lover of heat and with only a few precious days of holiday left, I would have preferred a scorcher. All that said, the garden has benefited enormously from the rain; the runner beans are swelling by the day, the tomatoes are proliferating and the lettuces have perked up endlessly since the rain.
As much as I love hot summers (oh the berry fruit!) we were reminded of one of the great joys of cooler weather: Soup. We were treated to a delicious Pumpkin Soup lunch made by our very culinarily capable friend Ben. After such a delicious change of fare, and feeling a little pinched for time, I got inspired to make another round of soup for tea: yes, it's been that cold. After a quick recon in the fridge, Mushrooms seemed the most logical base. Hmmm.. Add that great standby of the last minute meal - bacon, and dinner wont be far away.
Bacon and Mushroom Soup
Approx. 9 or 10 brown flat mushrooms - cut into cubes - about 3 or 4 cups full
5 rashers of streaky bacon - sliced into small strips
2 cloves garlic - crushed
2-3 tablespoons oil
2 tablespoons plain flour
approx 5 cups chicken stock or water or water with stock concentrate added - heated
50 ml cream
a splash of sherry - optional, port will also do the trick
Heat 2 tablespoons of the oil in a large saucepan and cook the mushrooms until they have melted into a black mass and released all their water. Transfer them to another bowl.
Add the remaining oil to the pan - no need to wash the pan first - fry the bacon and garlic until the bacon is quite crisp.
Add the flour and stir: the mixture with froth up; don't let it colour or burn.
Add the heated stock liquid to the pan in thirds, stirring constantly to avoid lumps forming until the soup boils.
Return the mushrooms to the pan, add the sherry, and simmer the soup for about 15 minutes.
Take the soup from the stove, add the cream, and blend until smooth. Return the pan to the heat. Add more water or stock if the soup is too thick. Check for seasoning - with all the bacon it will probably only require pepper. Heat sufficiently for serving, but don't let it boil once the cream has been added.
Serve with buttered toast for a quick, simple and tasty meal.
Holiday time in our house always has the added excitement of hosting our Plunket buddies. Little Miss 3 gets so excited about having her buddies over to play and I really enjoy catching up with the girls. We both enjoy making lots of treats to share with our friends: this time we made Ham and Blue Cheese Savouries, Sticky Lemon Slice, Chocolate Sponge Roll, Mini Carrot Cakes, Jellies and Chips and Dip.
The weather wasn't so good, but the children had a lovely time playing together. Here's the recipe for the Ham and Blue Cheese Savouries. They are super easy to make in no time at all. If Blue Cheese is not your thing then any ordinary cheddar will definately do the trick.
 Ham and Blue Cheese Savouries
1 small onion finely sliced
approx 3/4 cup finely cubed ham (or bacon if that's what's in the fridge)
a wedge of blue cheese - crumbled into small pieces
3 sheets of ready rolled butter puff pastry
3 eggs
approx 1.5 cups cream
ground pepper
Pre-heat the oven to 190 Deg. C.
Combine the prepared filling ingredients. Cut each pastry sheet into 9 pieces and press each piece into a muffin tin.
You could cut circles, but I prefer the easier way of cutting squares and you only end up throwing the off cuts away. Beat the eggs, cream and pepper together and pour it into a jug for easy pouring.
Place a spoonful of filling into each pie, then pour in the egg mix. Do not over fill. You don't want the egg mix to overflow out of the pastry.
Ham and Blue Cheese Savouries
1 small onion finely sliced
approx 3/4 cup finely cubed ham (or bacon if that's what's in the fridge)
a wedge of blue cheese - crumbled into small pieces
3 sheets of ready rolled butter puff pastry
3 eggs
approx 1.5 cups cream
ground pepper
Pre-heat the oven to 190 Deg. C.
Combine the prepared filling ingredients. Cut each pastry sheet into 9 pieces and press each piece into a muffin tin.
You could cut circles, but I prefer the easier way of cutting squares and you only end up throwing the off cuts away. Beat the eggs, cream and pepper together and pour it into a jug for easy pouring.
Place a spoonful of filling into each pie, then pour in the egg mix. Do not over fill. You don't want the egg mix to overflow out of the pastry.
Bake for about 15 minutes until the filling is cooked and the pastry golden brown.
Leave the savouries to cool in the tin for about 5 minutes before attempting to remove them.
Plate up and your done!
We had a lovely afternoon. Its hard to believe that its been three and a half years since we all met, new Mum's with our babies in tow, at Plunket Group. Already looking forward to next weeks catchup.
With the ever increasing price of beef and lamb, chefs and foodies all around the world are looking to cheaper cuts to satisfy our need for meat. The lamb or beef roast, traditionally the right of all New Zealander's weekend lunch, is now usually only seen gracing the table on special occasions. Price and the decreasing size of most families means that the large weekend roast of meat no longer makes economical sense. Who wants to eat cold roast until Wednesday when there's only three or four people to feed? Farmers wives have always known how to cook the cheaper cuts, and they usually had a crowd to feed. When the cattle beast or hogget is killed, every single cut is skillfully prepared to feed the family and the workers.
I could talk at length about the declining number of skilled butchers being trained and the need for supermarkets and industry leaders to provide smaller specialised cuts of meat, not just ban-sawed lamb leg 'steaks' or great lumps of miscellaneous 'roast beef', but that could take all day.
Instead, here's an easy recipe for one of the cheapest beef cuts around, skirt steak. We are getting to the end of the side of beef Mum and Dad gave us; this was one of the few cuts left at the bottom of the freezer. Despite being braised, its perfect for summer eating, as removing the meat and reducing the sauce means it doesn't eat like a stew. Its simple to make, and if you have a busy day planned, can be cooked in a slow cooker.
Food styling not so good today as the hungry guests were waiting!
Chimichurri Style Braised Beef
1 red onion, chopped
3 tomatoes, roughly chopped
3 cloves garlic
1/2 cup parsley leaves, chopped
a sprig of fresh oregano
1 small chilli, take the seeds out if you don't want it too hot
1 tsp smoked paprika
1/3 cut olive oil
1/4 cut lemon juice
1 teaspoon salt
Preheat the oven to 160 deg. C.
Put all the sauce ingredients into a kitchen whizz and blend until smooth. Be careful about how much chilli you add as chilli's vary in intensity. Its worth adding a little then trying the taste before adding more if needed.
If you wanted to use this mixture as a sauce for a grilled steak then de-seed and skin the tomato before blending. I left the seeds and skin on to retain the moisture for the braise.
 2 pieces of beef skirt steak - trim off all the tough silver skin to expose the muscle.
Any quantity of meat can be used, as long as there is enough sauce to cover it in the pan.
2 pieces of beef skirt steak - trim off all the tough silver skin to expose the muscle.
Any quantity of meat can be used, as long as there is enough sauce to cover it in the pan.
 Place some sauce in a high sided roasting pan followed by the meat, then the remainder of sauce on top. Choose a pan that is small enough to allow the meat to remain covered during cooking. Add 1 cup of water to the pan and cover tightly with either a lid or some cooking foil.
Because we had a big crowd coming for lunch, I added 5 scrubbed and cubed potatoes to the braise after about 1 and a half hours of cooking time.
Bake in the oven for approximately 2.5 to 3 hours until the meat is almost tender and soft. Remove the cover from the pan and return to the oven for another half an hour - don't worry about this step if your using a slow cooker.
Once cooked remove the meat from the braise and set aside on a cutting board. Remove the potatoes to a serving dish, and heat the sauce on the stove top until it is reduced and thickened. While it thickens, slice the meat into neat strip-slices across the grain. Place the meat onto the bed of potatoes. Taste the sauce to check the seasoning, then pour over the meat.
I served this dish with a red cabbage coleslaw and steamed corn and green beans.
For pudding I wanted to try out my cute new square baking pans. With so much lovely summer fruit around I baked these lovely little cinnamon butter sponge inspired cakes and
served them with custard. I chose the butter sponge over the egg sponge as I thought the fruit needed a thicker mixture to support it.
Cinnamon Fruit Butter Sponge Cakes
 125g butter
125g caster sugar
1 egg
125 plain flour
1 teaspoon baking powder
1 teaspoon ground cinnamon
1/3 cup milk - warm it to blood temp. before adding to the mixture
approximately 1.5 to 2 cups fruit - I used raspberries, black currents and sliced gooseberries.
Preheat the oven to 180 deg. C. Grease the moulds with butter. You could use muffin pans, or just one baking dish.
Cream the butter and sugar until pale. Add the egg and continue to beat.
Fold in the sifted flour, baking powder and cinnamon and the warmed milk.
Gently fold in the fruit being careful not to over mix or the fruit will break up.
125g butter
125g caster sugar
1 egg
125 plain flour
1 teaspoon baking powder
1 teaspoon ground cinnamon
1/3 cup milk - warm it to blood temp. before adding to the mixture
approximately 1.5 to 2 cups fruit - I used raspberries, black currents and sliced gooseberries.
Preheat the oven to 180 deg. C. Grease the moulds with butter. You could use muffin pans, or just one baking dish.
Cream the butter and sugar until pale. Add the egg and continue to beat.
Fold in the sifted flour, baking powder and cinnamon and the warmed milk.
Gently fold in the fruit being careful not to over mix or the fruit will break up.

Carefully spoon the mixture into the molds.
Mix an additional 1/3 cup of sugar with 1 teaspoon of cinnamon and top each cake with a sprinkled teaspoonful.
Bake for approximately 10 to 15 minutes.
The meal was really well recieved. The boys (Aunty Em's nephews) weren't so sure about the chilli aspect, but they enjoyed the pudding) It's been great to have so much more time over the holidays to cook and eat and spend time with our family and friends. Hope your all enjoying the season.
Anyone who has ever had anything to do with agriculture in general knows that farm labour functions on its stomach. Nothing can be better than a hearty meal and a cup of tea after a few hours of burning sun, dusty nor west wind and general hard slog.
Yesterday out of the blue we got the SOS from mother - she was sick and the shearers were crutching lambs at the farm for the day. For those that are not farm raised, crutching is, in the words of Little Miss 3, "trimming the wool off the lamb's bottoms." It was all hands on deck helping in the yards with keeping the sheep up and no one available to cook the meals. So in the car and off we went. LM3 was stoked with a surprise visit to Nana and Poppa's house.
With no time to spare and morning tea scheduled for 9.30am, a quick stop in at Darfield Bakery and Cafe supplied the morning tea. The food was very good indeed; the Afghan's actually tasted like homemade and the staff were very obliging in finding enough cold savouries for us. Another half hour in the car and we were there. While LM3 and I attended to the garden, chickens and ducks, The Chef cooked a lunch of vegetable soup, roast pork with new potatoes and apple and berry pie. With lunch out of the way it was my turn to come up with a nice afternoon tea.
Keen to use some of the fruit from the garden, as well as making an indulgent treat, I decided on using my Walnut Sweet Pastry as a base for a couple of different tarts.
Make the walnut pastry and leave to chill. Set the oven to 190 deg. C.
 For the Gooseberry tarts: I washed, topped, tailed and sliced in half approximately 1 cup of gooseberries. Mix with 1 tablespoon of cornflour and 1/3 cup of sugar.
 For the Caramel tarts: Combine 60g butter, 1 can of condensed milk and 1 tablespoon of golden syrup in a small saucepan. Stir over a low heat until the butter is melted and the mixture starts to thicken. It needs to be stirred constantly or it will catch on the bottom and burn. Set aside while rolling the pastry.
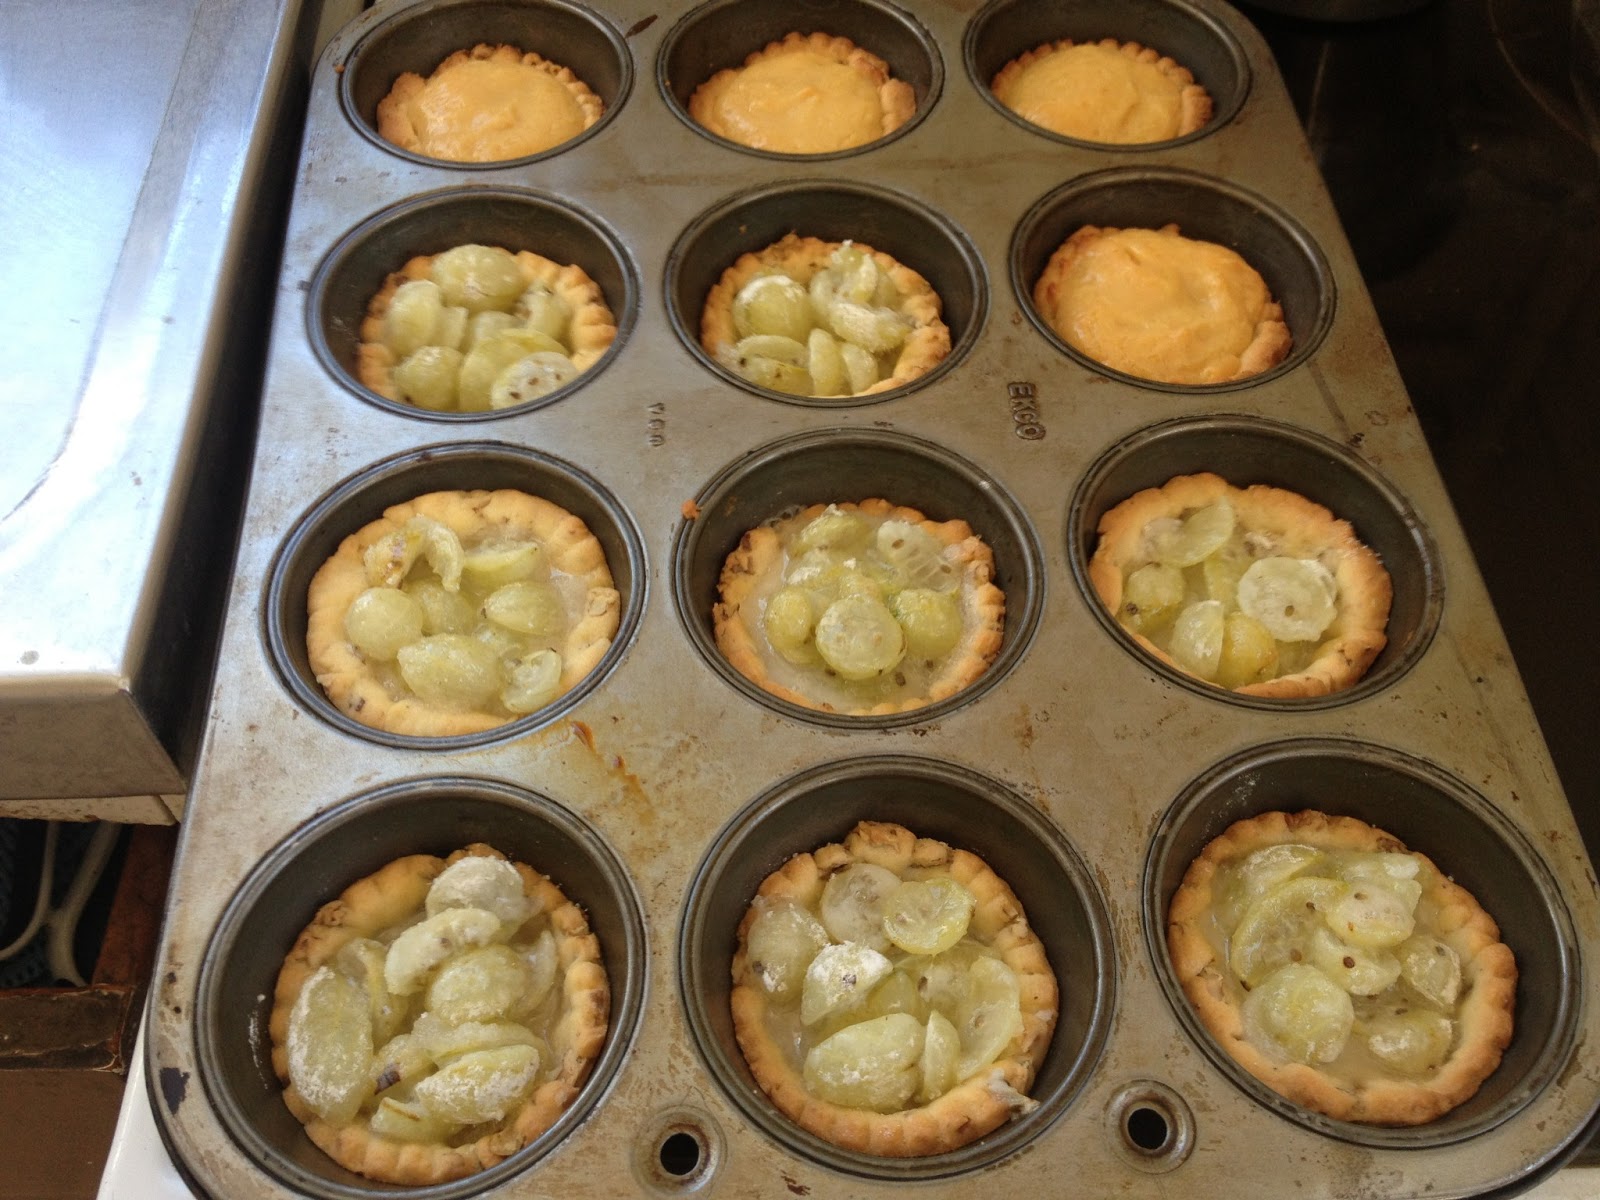
Roll the pastry out between 2 sheets of plastic wrap until about 4mm thick. Cut into circles, I used a fluted cutter, but a simple jar will do the same job. Place each one into the bottom of a muffin or tart pan. The mixture is quite delicate and needs to be handled gently, especially on a hot day. Press a little piece of cooking foil into each tart case and bake blind for 6-8 minutes. Take from the oven and remove the foil.
 Fill half the tarts with the gooseberry mixture and the other half with the caramel. I popped a chocolate melt on top of some of the caramel ones. Don't overfill.
Bake for a further 8 minutes. The filling should have bubbled. Be careful, as you can see, a couple of extra minutes can leave them over baked! Leave to cool in the tin for about 10 minutes before attempting to remove by easing out with a knife.
I got short of time and had to leave the tarts in their tin to take up the hill to the wool shed. Everyone was happy with their afternoon tea, Nana was feeling better after a day in bed and LM3 had a lovely afternoon inspecting the livestock.
We have just had a few lovely days away on holiday. Some of which we spent with my sister in the lovely city of Dunedin. The weather was kind to us while we were there - which was more can could be said the rain, cold wind and snow on the mountains in other parts of the country.
Dunedin is a great place to visit: coming from Christchurch it's a novelty to visit a city with a bustling CBD. We cruised the Octagon for eating places; enjoyed the local produce at the Saturday Market; visited great vintage shops; sweltered in the butterfly house; paddled on the beach at McAndrew Bay; and had tea, feed the fish, and enjoyed as much contemplation as one manages to get with a 3 and a half year old at the very impressive Chinese Gardens.
It was great to spend some time with my sister and help her to celebrate her birthday. Little Miss 3 had a great time with Auntie Char-Char. Though I think Char may have been looking forward to some quiet time after her departure. Trendy inner city apartments are not ideal places for small children, even when they are big enough to hold a badminton court; Little Miss loved the novelty of it all and we were just glad none of the neighbours complained about the excited squeals.
 We thought it would be nice to bake the birthday girl a cake. I gave her a Sophie Dahl cook book for Christmas, so with a few days up my sleeve I had the opportunity to have a good look through it. The recipes look really good and the biographical commentary sprinkled through-out the book make for really interesting reading. Anyway, it was an easy decision to try the flour-less Chocolate Cake. Armed with all the ingredients and my sisters antique Kenwood mixer, the cake came out quite well. I changed the method as Char doesn't have a kitchen whizz.
Sophie Dahl's Chocolate cake
300g dark semi sweet chocolate
1 cup caster sugar
180ml water
225g butter
1 tablespoon vanilla extract
6 eggs - separated
Preheat the oven to Bake at 180 deg. C. Grease and line a round 25cm spring form baking tin.
In a large saucepan melt the chocolate, butter and sugar together over a low heat. Take the pan from the heat and whisk in the water until the mixture is smooth. Add the egg yolks and vanilla and whisk again. Set aside.
In a large clean mixer bowl whisk the egg whites with a pinch of salt until stiff peaks form. Don't over mix: if the whites start to look dry they will be difficult to fold into the cake.
Pour one third of the chocolate mix into the whites and begin to gently fold together. Add the remaining thirds in two steps. Be careful not to knock the air out of the mixture as there is no other raising agent in the recipe.
Bake for approximately 45 minutes. The cake will puff up in the oven, and the centre will still have some wobble. It will sink down once it starts to cool. Let it sit for a few hours before attempting to get it out of the tin.
Dust with icing sugar and whatever fruit you have on hand. At this time of year raspberries would be amazing.
After a really delicious birthday dinner at Two Chefs, we came back to the apartment for birthday cake pudding; I thought the cake would fall into pieces for sure, given I got it out of the oven just before we left for the restaurant, but it stuck together. It's a really rich cake, and needed to be served with the cream. Having no flour makes it perfect for serving to Gluten free guests.
We thought it would be nice to bake the birthday girl a cake. I gave her a Sophie Dahl cook book for Christmas, so with a few days up my sleeve I had the opportunity to have a good look through it. The recipes look really good and the biographical commentary sprinkled through-out the book make for really interesting reading. Anyway, it was an easy decision to try the flour-less Chocolate Cake. Armed with all the ingredients and my sisters antique Kenwood mixer, the cake came out quite well. I changed the method as Char doesn't have a kitchen whizz.
Sophie Dahl's Chocolate cake
300g dark semi sweet chocolate
1 cup caster sugar
180ml water
225g butter
1 tablespoon vanilla extract
6 eggs - separated
Preheat the oven to Bake at 180 deg. C. Grease and line a round 25cm spring form baking tin.
In a large saucepan melt the chocolate, butter and sugar together over a low heat. Take the pan from the heat and whisk in the water until the mixture is smooth. Add the egg yolks and vanilla and whisk again. Set aside.
In a large clean mixer bowl whisk the egg whites with a pinch of salt until stiff peaks form. Don't over mix: if the whites start to look dry they will be difficult to fold into the cake.
Pour one third of the chocolate mix into the whites and begin to gently fold together. Add the remaining thirds in two steps. Be careful not to knock the air out of the mixture as there is no other raising agent in the recipe.
Bake for approximately 45 minutes. The cake will puff up in the oven, and the centre will still have some wobble. It will sink down once it starts to cool. Let it sit for a few hours before attempting to get it out of the tin.
Dust with icing sugar and whatever fruit you have on hand. At this time of year raspberries would be amazing.
After a really delicious birthday dinner at Two Chefs, we came back to the apartment for birthday cake pudding; I thought the cake would fall into pieces for sure, given I got it out of the oven just before we left for the restaurant, but it stuck together. It's a really rich cake, and needed to be served with the cream. Having no flour makes it perfect for serving to Gluten free guests.


 Ham and Blue Cheese Savouries


 2 pieces of beef skirt steak - trim off all the tough silver skin to expose the muscle.
 Place some sauce in a high sided roasting pan followed by the meat, then the remainder of sauce on top. Choose a pan that is small enough to allow the meat to remain covered during cooking. Add 1 cup of water to the pan and cover tightly with either a lid or some cooking foil.


 For the Gooseberry tarts: I washed, topped, tailed and sliced in half approximately 1 cup of gooseberries. Mix with 1 tablespoon of cornflour and 1/3 cup of sugar.
  For the Caramel tarts: Combine 60g butter, 1 can of condensed milk and 1 tablespoon of golden syrup in a small saucepan. Stir over a low heat until the butter is melted and the mixture starts to thicken. It needs to be stirred constantly or it will catch on the bottom and burn. Set aside while rolling the pastry.
 Fill half the tarts with the gooseberry mixture and the other half with the caramel. I popped a chocolate melt on top of some of the caramel ones. Don't overfill.