Saturday 30 March 2013

Dave Spice at the Oxford Show

What a great day for the Oxford Show. The sun was shining and all the locals seemed to have turned out. Little Miss 4 was keen to see the animals and we were keen to see Dave Spice, one of the man of the house's teaching colleagues, do his cooking demonstration. He was teamed up with the local butcher and a wine expert to present a number of dishes based on a boned chicken and a boned shoulder of pork.
The heat was on and the wine expert strangely silent given his inclination to sample a drop or two of the product. Dave cooked an ambitious number of dishes utilising nearly all the parts of the meat.

Many of the dishes used conveniently store-able spice rubs to add flavour to the raw ingredients. The demo was really good watching, and appreciated by the typically rural audience. I had to fight my way to the front to take a photo of the finished dishes, and was lucky to get a shot that wasn't full of keen tasters hands snatching at the food.

I thought I would share one of the spice rub recipes Dave used on the pork steaks. It would be suitable for any cut of meat you might be thinking of cooking on the BBQ or grill.

Texas Barbecue Rub

1 cup firmly packed dark brown sugar
1/2 cup kosher salt
1/2 cup granulated garlic - a dried garlic product
1/2 cup paprika
2 tablespoons granulated dried onion
1 tablespoon dry mustard
1 tablespoon creole seasoning
1 tablespoon chilli powder
1 tablespoon ground red pepper
1 tablespoon cumin
1 tablespoon black pepper

Stir all the ingredients together in a bowl. Store in an airtight container. Makes about 3 cups.
Coat the steaks in the spice rub.
After rubbing in the spices, I would oil them by placing a generous amount of oil on a clean plate and running them through before putting on a hot BBQ or grill. That way the steaks don't stick and the grill wont smoke as much with the excess oil burning off.

Little Miss 4 has a great time at the show.

She saw all the animals, had a turn on the bouncy bungy, enjoyed the Scottish pipe band, ate candy floss and ice cream, and brought lollies to take home for Poppa.

Friday 29 March 2013

Treats from Nana's Garden

Nana has a great garden. And we are very lucky to be able to take advantage of all the autumn harvest produce. Yesterday we rustled up a quick lunch using tomatoes  and basil from the glass house, herbs and potatoes from the garden and walnuts from the tree. I made vinaigrette verde and basil and walnut pesto to dress up our simple autumnal meal. 

Vinaigrette Verde

The quantity ratios and ingredients for this recipe vary according to what is available and what lands in the jar while I am making it. The simple rule of thumb is 1 part acid to 3 parts oil. All the other ingredients are variable. Put all the ingredients into a large jar wide enough to accommodate the stick blender.


1/4 cup red wine vinegar
3/4 cup olive oil, or a combination of olive and any other mild flavoured oil
a generous handful of fresh herbs from the garden: I used parsley, chives and thyme
1 tablespoon sugar
1 teaspoon salt
1 teaspoon pepper
2 tablespoons sweet chilli sauce
2 cloves of garlic


Put all the ingredients in a wide jar with a lid and blend with the stick blender.
Check for seasoning and adjust as required.
Any left over vinaigrette can be stored in the fridge and will keep for a few days.


Arrange washed and sliced tomatoes in a shallow dish and spoon over a generous amount of the vinaigrette. It makes a great salad to serve with bread and cold meats.


Basil and Walnut Pesto

Again quantities for this recipe are approximate and can be altered to suit your personal taste and the quantity of basil available. I didn't put Parmesan into this batch as Nana didn't happen to have any.

1 couple of handfuls of fresh basil with the hard stalks cut off
any off cuts of parsley stalks you happen to have
1/2 cup shelled walnuts
approximately 1/2 cup olive oil - or any other oil you happen to have
1 teaspoon salt


Blitse the whole lot in the food processor until blended, but not too finely.
Stored covered in the fridge it will happily keep for a few days.

This pesto is tasty served with new potatoes and butter, and as a topping for bread. 

With lunch all done, its time for Little Miss 4 to head out to the chicken house for egg collection duty. She just loves spending time at the farm with Nana and Poppa.

Wednesday 27 March 2013

Lovely Hot Cross Buns for Easter

Baking up a batch of Hot Cross Buns is one of our family's favourite seasonal treats. Often disappointed by the supermarket product, these buns have a far more generous amount of fruit and spices. You don't have to include the crosses; however it doesn't take long and they add the seasonal finishing touch to the buns.

Little Miss 4 is such a generous and caring little button. After we took some buns to Preschool to share with her teachers, she wanted 'my buddies to try the Hot Cross Buns'. So back home we went to bake another batch.

I adapted these from an old Alison Holst recipe. You can vary the type of fruit and spices depending on whats in the pantry. Any combination of sultanas, currents, raisins or even cranberries will do the trick nicely.

Hot Cross Buns

1 cup milk
1 cup hot water
2 tablespoons sugar
4 teaspoons active dry yeast
2 cups high-grade flour
100g butter
1 cup soft brown sugar
1 egg
1 teaspoon salt
1 tablespoon mixed spice
1 tablespoon cinnamon
1 teaspoon ground cloves
3 cups dried mixed fruit
approx 3 cups high grade flour

For the crosses
60g cold butter
1 cup flour
a little milk for glazing

For the glaze
2 tablespoons golden syrup
1 tablespoon warm water

Measure the milk, hot water and sugar into a large bowel. Stir to dissolve the sugar and allow to cool to blood temperature, then sprinkle on the yeast granules. Stir to mix, then mix in the first measure of flour. A whisk is quite useful to remove any lumps. Cover the bowl with plastic wrap and set into a sink of warm water until the mixture has at least doubled in size.
Prepare the dried fruit by putting it into a bowl and covering with boiling water. Stir and leave for about 5 minutes to plump up. Drain and rinse, then leave in the sieve to drain. 


In another bowl cream the butter and sugar until pale and creamy. Beat in the spices, salt and egg.

Turn the oven to bake on its lowest temperature setting. It should feel warm but not hot.


Once the yeast mixture has sufficiently risen, add the butter mix, fruit and second measure of flour to the bowl. Stir until blended.

Continue to stir until the mixture starts to become more elastic. Turn out onto a floured bench and knead.


The mixture will be sticky and difficult to work with in the beginning. Add more flour to the bench if required, and continue to knead until the dough feel satiny and springs back when pressed.


Cut the dough into four equal sized pieces. Cover the dough pieces with plastic wrap while you work on shaping the buns, as it shouldn't be allowed to dry out. 

Grease or spray a couple of baking tins ready to receive the buns. Cut each dough quarter into 6 pieces and roll each bun between your hand and the bench until it forms a neat round. Pop the buns into the tin, leaving gaps between them to allow for rising. 

Once full, cover the trays with plastic wrap that has been greased and sprinkled with a little water. Place into the warm oven to rise. Put a small stainless steel bowl of water into the bottom of the oven to provide some steam. The buns should rise until they are twice the original size and have filled the gaps in the tin.


While the buns are rising, prepare the dough for the crosses. Rub the butter into the flour, then add a little water to form a stiff dough. Roll out between two pieces of plastic wrap. 

Once the buns have risen take them from the oven and increase the oven temperature to 225deg. C. Cut the cross dough into strips, brush the buns with a little milk and place the strips onto the unbaking buns.


Bake uncovered for 12 to 15 minutes until brown. Tap on the top of the buns, they should sound hollow once baked. Gently turn the buns out onto a tea towel and flip over into a cooling rake.

Mix the golden syrup and hot water and brush on the cooked buns to glaze.

These buns are best served warm. They don't have any preservatives so don't keep for very long and are best served soon after being baked.

So call up your friends and get them round for a coffee and a tasty Easter treat.


Little Miss 4 was so excited to take her buns to Preschool for her buddies to try. We are always looking for opportunities for her to share things with others, and food is always a perfect opportunity. Happy little girl. 

Saturday 23 March 2013

Multi-purpose Mince Recipe

Everyone needs a go-to recipe for whipping up a quick mince based family dinner dish. This super versatile recipe takes little more than half an hour to cook and can be served with Taco or tortilla wraps, mixed with cooked pasta shapes or spaghetti, used in lasegna or cannaloni, served with nachos or simply with toast. Make a big batch and freeze until later. It easily defrosts in the microwave or in a pot on the stove for a quick mid-week dinner solution. It will happily keep in the fridge for a few days; just be sure to reheat it well.

Savoury Mince

550g beef mince
1 onion
1 heaped teaspoon crushed garlic
1 tablespoon vegatable oil
1 standard can tomatoes
1 tablespoon sugar
1 teaspoon salt
1/2 teaspoon hot pimento powder - I used La Chinata Pimenton

Finely slice the onion and crush the garlic. Heat the oil in a frying pan and cook the onion and garlic until they begin to soften.

Add the mince and cook until all the water evaporates and the mince is brown. I mean really brown, not just no longer pink. This will take about 10 minutes, but is worth doing for the extra flavour it provides. Stir it frequently to ensure all the mince is browned.

Add the canned tomatoes and approximately a can full of water. Add the pimento powder, sugar and salt.

Simmer until the mince is cooked, the water has evaporated and the mixture is thick.

Taste and adjust the seasoning as required.


I made a simple salsa out of de-seeded tomatoes from the garden, an avocado, a green pepper, the juice of half a lemon and a splash or two of good olive oil.
We had tacos with the mince, iceberg lettuce, sliced peppers and the salsa.


While I was cooking, Little Miss 4 helped out with some gardening. She was so excited about planting the flowers.

Dinner on the table.


Tuesday 19 March 2013

Spanakopita served with Hummus

There is nothing like that unique challenge of getting tea on the table before Little Miss 4's ravenous tummy takes over and she starts ripping at things from the fridge and pantry like a little starved possum. Second only to this are the nights when the man of the house is working late. Thanks to my lovely colleague Rebecca for this fabulous, made in a flash, healthy dinner recipe. I chose to serve it with hummus, after all spinach is enough of a vegetable to banish veg related parental guilt!

Spanakopita is a classic Greek spinach and feta cheese pie. I have made lovely little triangles perfect for little hands and tummys. This recipe makes six triangular pies. Enough for two adults and a child, plus one for preschool lunch the next day.

Spanakopita

a bunch of spinach
1/2 onion
2 tablespoons olive oil
1 egg, lightly beaten
50g feta cheese, crumbled (I used goat's milk feta as I like the stronger flavour)
1 tablespoon grated Parmesan
1 tablespoon parsley, finely chopped
1 teaspoon fresh marjoram leaves, finely chopped
Freshly ground black pepper
6 sheets of filo pastry
25g melted butter

Preheat the oven to 190deg. C

Wash the spinach and cook slowly in a pan in only the water that is clinging to it. Once wilted allow to cool and squeeze out as much water as possible. Coarsely chop and place into a bowl.

Gently fry the onion in the olive oil. Add both onion and oil to the cooked spinach. Stir in the egg, cheeses, herbs and pepper.


One at a time brush the filo sheets with butter and layer into two sets of three sheets each. Cut each set of sheets into 3 strips as shown in the photo.

Place a small amount of mixture at the end of each strip and fold the filo and filling over to form a triangle shape, continuing until you reach the end of the strip and the filling is completely enclosed. Fold up all six triangles.


Brush the top with a little more butter and bake on a paper lined tray for 15 minutes. They should be golden and crisp.
Allow to stand before serving.

Hummus

1 standard can chickpeas - drained
juice of a lemon
1 clove garlic
approximately 4 tablespoon olive oil
salt to taste

Blend the chickpeas, lemon juice and garlic in the food processor. Add the olive oil a tablespoon at a time until a smooth spread forms. Add salt and test the seasoning.
I deliberately leave the tahini out of our Hummus due to a sesame allergy. It is just as nice without it.

On the plate and to the table, with just enough time left over to catch a little of the news before bedtime stories beckon.

Sunday 17 March 2013

Recipes By Request: Passionfruit Cupcakes and Toffee Coated Cream Puffs

 After the bustle of last week's party preparations and celebrations, we have had a rather laid back weekend: swimming, a bit of grocery and a walk around the market. Little Miss 4 is enjoying playing with all the lovely and very generous birthday gifts her buddies gave her.

I have had a couple of requests for party food recipes, and as with all recipes I'm more than happy to share them. A successful recipe shared is a priceless gift to the world. 
I haven't recorded them tutorial style as time pressures last weekend meant that I didn't photograph any of the baking process. If you're not sure of any of the processes, just ask and I will be more than happy to oblige you with an answer.

Passion fruit Cupcakes
This is one of my own adaptations on a lemon cupcake recipe.

125g butter - softened
2/3 cup caster sugar
zest of 1 lemon
 2 eggs
1 1/4 cups flour
1 1/2 teaspoons baking powder
1/4 cup milk
3 tablespoons sweetened passion fruit pulp - with the seeds sieved out

Preheat the oven to 180 deg. C. Ensure your eggs and milk are at room temperature.
Cream the butter and sugar until light and fluffy. Add the lemon zest and passion fruit pulp, followed by the eggs (Add the eggs to the butter mix in two parts to avoid the mixture curdling.) Beat until smooth. 
Sift the flour and baking powder together. Fold into the butter egg mix alternately with the milk.
To save time, I piped the mixture into the cup cake cases, but spooning it in is just as good.
Bake for 10 to 15 minutes depending on the size of the cup cake. A tooth pick inserted into the centre should come out clean.

Passion fruit Frosting

2 egg whites
1 cup sugar
1/3 cup water
1/2 cup sweetened passion fruit pulp
250g butter - softened

Place the water and sugar into a small saucepan and stir over a medium heat until the sugar is dissolved. Once dissolves do not stir, just leave to boil until the sugar reaches 120 deg. C
While the sugar is boiling beat the egg whites until soft peaks form.
Once the sugar reaches 120 deg. C. pour it, in a thin stream, over the beaten whites until a shiny meringue forms. Beat until the mixture cools enough for the boil to be warm but not hot. Now put the softened butter in a few tablespoons at a time. Beat until the whole mixture is soft and white. Now add the passion fruit pulp, with its seeds, and beat briefly until combined.
I used a star nozzle to pipe the frosting onto the cooled cupcakes.


Toffee Coated Cream Puffs
These are inspired by Croquenbouche choux buns, except that I have filled them with cream instead of pastry cream. I got the Pate a Choux recipe from book The Roux Brothers on Patisserie by French cooking and baking legends Michel and Albert Roux.

125ml water
125ml milk
100g butter - cut into small pieces
1/2 teaspoon salt
3/4 teaspoon sugar
150g flour
4 eggs - 240g weight

Preheat the oven to 220 deg. C.
Cooking the paste: Put the water, milk, diced butter, salt and sugar in a saucepan, set over a high heat and boil for 1 minute, stirring with a spatula. Take the pan from the heat and, stirring all the time, quickly add the sifted flour. Stir until smooth.
Now 'dry out' the mixture by replacing it on the heat and stirring with a spatula for 1 minute. The mixture will begin to poach and some of the water will evaporate. Tip the paste into a bowl - I used the beater bowl - and allow to cool a little.
Adding the eggs: Beat in the eggs one at a time using the electric beater until the mixture is smooth.
Piping the paste: Choose a round nozzle and pipe out small choux buns onto non-stick sprayed baking paper.
Bake in a preheated oven for 10 minutes, then turn the heat down to 180 deg. C and leave the buns to dry out for another 10 minutes. The puffs should be quite crisp and dry.

Toffee Coating
2 cups sugar
1 cup water
1 tablespoon liquid glucose

250ml of cream and 2 tablespoons of icing sugar for filling

Put all the ingredients into a medium sized pan and stir until the sugar has dissolved. Once dissolved stop stirring and leave to boil until it reaches 160 deg. C. It should be a very clear amber colour.
Dip the top of the choux buns into the toffee one at a time and place onto baking paper. Be very careful not to burn your finger tips on the hot sugar. If the toffee cools and becomes too thick, carefully return to the heat and move the pan around until it becomes liquid again. Be careful not to allow it to colour any further. 
Once the toffee is cold, cut the bottom from each puff and fill with whipped cream. Replace the bottoms and pile onto a plate to serve. The cream should start to soften the buns. 

The sticky lemon slice in the first photo is a real favourite and already on the blog.

Enjoy your baking!

Tuesday 12 March 2013

Patchwork Ballet Bag


What do you get a little girl for her birthday when she actually has everything she really needs? We asked ourselves this question quite a few times recently. After getting really carried away at Christmas - she was shelling parcels like peas - we decided to keep things simple this birthday. Little Miss 4 told us she wanted a paint set and a ballet leotard.  Easy. One quick trip to a stationery store and quite a lot of deliberating in the dance store's changing room and we were all set. I also wanted to give her something else of a more practical nature, and pretty as well of course! Hence the cute, not so little, yet very practical patchwork ballet bag.

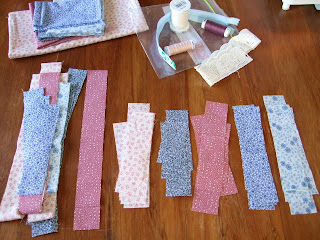
I started by selecting a variety of complimentary fabrics from the stash and cutting them into 2 1/2 inch strips. The fabric was all pre-washed so the finished bag will withstand washing. I decided to take the random chance pattern approach, and simply cut the strips into a variety of sizes.
Sew the random pieces together to form one continuous strip.
I decided on a 25cm zip. Because I was using an imperial measure patchwork mat I cut the strips into 11inch sections. I moved the sections around until I had a nice mixture of patterns without too many running into each other. 
Using a quarter inch width sewing machine foot, sew all the sections together to form the body of the bag. I sewed both sides of the bag as one section, so the zip was stitched to each end of the panel.
Having sewed the panel to the correct size I ired the seams down and squared up the panel using the patchwork ruler and rolling cutter.
I needed to reinforce the sides of the bag, so brought some iron on patchwork wadding. I pressed it onto the reverse of the panels and pinned the whole thing to a large panel of lining fabric. The next step is to sew the layers together. Always sew from the left to the right as opposed to back and forth in each direction, as sewing in each direction will distort the size of the panel. Trim the extra wadding and lining away. At this stage I sewed one of LM4's name tags to the outside of the bag.
Now attach the zip to one end of the panel by putting the right sides of the fabric and zip together and, using a zipper foot, sew as close to the zip as possible. Attach the other side of the zip to the other end of the panel. Sew bias binding over the raw edges.
Match the right sides of the bag together and pin and sew them. Sew bias binding over the raw edges making sure the ends of the bias are tucked in. 
Turn the bag out to the right side and push the corners out. To make the strap, sew some of the left over strips together along each side to form a tube. Turn it into the right side by attaching a large safety pin to one end and threading it through the centre of the strap. Check the length and fold the ends over before sewing them onto the bag. 
Not bad considering most of the sewing was done between the hours of 8.30pm and 11 o'clock the night before her birthday. 


All ready for stuffing clothes into and safely zipping up before ballet class begins.

Monday 11 March 2013

Little Miss Party Girl


We had a lovely party on Sunday. Little Miss 4 had a wonderful time with her buddies. They were entertained by Melanie Poppins with face painting, balloon toys, the party rabbits, entertaining puppets and a magic show.


Everyone enjoyed the hospitality. The chef made the sandwiches and sushi - and the impressive centre piece made of fruit and vegetable flowers. I wondered what he was doing carving at a melon, and low and behold, he pops this impressive vegetable arrangement on the table!
This is a small sample of the sweets - with more goodies outside on the children's table.
Little Miss 4 wanted a Barbie Mermaid cake. I made a Carrot Cake using my usual recipe and decorated it with Cream Cheese Icing sprayed with green cake decorating spray. I couldn't bring myself to colour the whole batch of icing green. The image of green tongued little people leaving the party was too terrible to contemplate. I covered the Barbie with pink tinged Bakels Pattinice White Icing to form her tail and bodice. The children all wanted a slice of the tail!
Happy little party girl making friends with one of the party rabbits. We all had a lovely party; thanks to all our wonderful guests for sharing a great party afternoon with us.