Wednesday 23 December 2015

Christmas Chocolate Mud Cupcakes with Meringue Toffee Frosting Recipe

These cupcakes are a great little treat. They keep well in the fridge and make excellent thank you gifts at this time of year. Our little miss took some to her swimming teachers, some to riding school on the last day, and some to Santa at Ballantynes. The toffee frosting is a lovely light alternative to buttercream. We added strawberries and blueberries to give them a nice cheerful Christmas theme. The cupcakes can easily be made gluten free by using Bakels gluten free flour instead of wheaten flour. 

Chocolate Mud Cupcakes with Meringue Toffee Frosting. 

1/2 cup vegetable oil
250ml cream
50ml espresso
1 cup boiling water
1 teaspoon vanilla essence
2 eggs, beaten

2 cups brown sugar
1 teaspoon salt
2 teaspoons baking soda
2/3 cup cocoa powder
1 and 3/4 cups flour


Preheat the oven to 160 deg. C. Put out 35 small, free-standing cupcake cases onto a baking tray.

Sift the flour and cocoa together and set aside. 
In a large bowl, whisk together the oil, cream, espresso, boiling water, vanilla essence, lightly beaten eggs, brown sugar, salt, and lastly the baking soda. 


Add the flour to the liquid and gradually whisk the mixture to combine it. 

Place the mixture into a jug to make it easier to pour into the cupcake cases.


The cupcakes rise quite a lot, so only half fill each case with mixture.  


Bake for 25 minutes until well risen. The tops should bounce back when pressed. Allow to cool completely before decorating with the toffee frosting.  


Meringue Toffee Frosting

175g granulated sugar
1 tablepoon liquid glucose
40ml water
3 egg whites. 

Separate the eggs. Reserve the egg yolks for another recipe. Beat the egg whites until firm peaks form. Not so much as the whites start to look dry, just stiff enough to stand up when the beater head is raised out of the mixture. 
Put the sugar, glucose and water into a small pot over a medium heat. Stir until the sugar dissolves, then stop stirring and boil until the toffee reaches 145deg. C on the sweet thermometer or until it's a light brown colour. 

With the beater running, dribble the toffee into the beaten egg whites a little at a time. The egg whites will start to look glossy, then turn a nice thick toffee colour. Be very careful with the hot toffee! 


Working quickly before the frosting sets, use a piping bag and star nozzle to pipe rosettes onto each cupcake. If you don't have a bag and nozzle, just use a knife to spread a generous amount onto each one. 

Top each cupcake with a quarter of strawberry and a couple of blueberries. Any summer fruit will do. 

Store the frosted cupcakes in an airtight container in the fridge. 

I got a super cute and practical cupcake holder box from a $2 store in the mall - definitely worth getting for easy transportation.  


Happy baking everyone, and a very merry holiday season to you all xxx 

Monday 21 December 2015

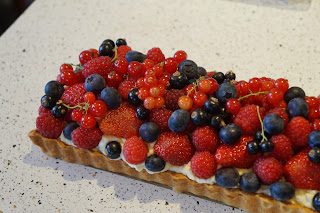
Summer Fruit and Mascarpone Tart

The sweet taste of the first of the summer soft fruits is one of my highlights of the culinary year. We are feeling quite chuffed to say that most of the fruit for this dessert came from the corner of our garden. This fruit tart is great for a dinner party, as it looks really spectacular, but is easy to make in advance and easy to assemble. I used my usual sweet pastry recipe. This recipe can be just as easily made into smaller individual tarts if required. 

Summer Fruit and Mascarpone Tart
serves six generous portions, or eight smaller


For the tart case:

I used this recipe for short sweet pastry from a previous post. Only half the recipe quantity is required. The reminder can be frozen for use later. 

Preheat the oven to 185deg. C. 

After chilling the pastry, roll it between a sheet of baking paper and a sheet of plastic food wrap. Lift the paper and leave the pastry stuck to the plastic wrap. Now use the plastic wrap to guide the pastry into a long, loose bottomed tart tin. Once in the tin, peel the plastic away and trim the pastry from the edges using a knife. Mend any holes using the off cuts. 


Crumple the previously used sheet of baking paper, then ease it into the tin and over the pastry. Crumpling it first makes the paper easier to handle.  
Now fill the paper lined pastry with either baking rice or beans. 


Bake for 20 minutes then take from the oven and remove the paper and rice. Return to the oven and bake a further 10 minutes until the pastry is very crisp and quite brown. The pastry will have shrunk from the sides of the tin. 


Allow to cool for 10 minutes before removing from the sides of the tin. Leave the base of the tin attached to the tart as this will help to support it. Allow to cool completely before adding the filling. 


For the Filling: 
400g mascarpone 
3 to 4 tablespoons icing sugar
the juice and zest of 1 lemon
1 cup cream
a selection of seasonal fruit, about 3 cups - I used strawberries, raspberries, blueberries, and red and black currents. 

Beat the mascarpone, sugar, lemon zest and juice together until smooth and soft, then set aside. Beat the cream until soft peaks form. Fold the mascarpone into the beaten cream a third at a time. Taste for sweetness, and fold in a little more icing sugar if you require it. 

Store the filling in the fridge until it is required. 


Half an hour before the guests arrive, fill the tart case with the filling. I like to pile it up so it looks nice and generous. You want the case to stay nice and crisp, fill it too soon and it will become soft. 

Any extra filling can be eaten later with whatever left over fruit is available, or use the extra pastry to make a few small tarts to fill. 


Now arrange the seasonal fruit. Hull the strawberries and slice them in half if they are large. Add the raspberries, blueberries, and red and black currents. Don't worry about being exact - it's supposed to look casual. For the Provencal touch, leave the currents on their stalks.


Now use a sieve to dust the whole lot with a generous layer of icing sugar. 

If you don't have a long enough serving dish, just spread out a clean, crisp, cloth serviette and present it straight onto the table. 

You wont need to worry about any leftovers with this tart. 

Happy festive baking xx

Friday 18 December 2015

Holiday Season Baking - Chocolate Apricot Truffles

Here is the other half of our Christmas gifting to our Little Blossom's Riding teachers. These delicious Chocolate Truffles have featured on here before with cranberries. This time around I've gone for the classic dried apricot addition. 

Chocolate Apricot Truffles

1 cup icing sugar
4 tablespoons cocoa powder
250g sweet biscuit crumbs - I used wine biscuits and crushed them in the food processor
175g butter
125g dark chocolate - I used Whittakers 72% Dark Ghana
half a cup of New Zealand dried apricots

For the chocolate coating you will need an extra 375g dark chocolate - I used the slightly sweeter 50% cocoa Dark Block - and 
2 to 3 tablespoons vegetable oil


Combine the icing sugar, cocoa and crushed biscuit crumbs in a bowl. 

In another bowl melt the chocolate and butter together. I do this by giving it short 10 second bursts in the microwave and stirring well in between. Do this a couple of times until half the chocolate has melted, then just stir until the remaining chocolate is smooth. 


Stir the melted mixture into the dry ingredients and mix well. 


Slice the apricots into small squares and stir into the mixture.


Take spoonfuls, roll into balls and place on a tray or plate ready for chilling. 


While the truffles chill in the fridge, melt the extra chocolate and stir in the oil. Be very careful not to overheat!

Using a large fork, dip each truffle into the melted chocolate, tap off the excess and place on a lined tray. Do not refrigerate or the chocolate will dull. 


Leave them at room temperature to set before either packaging in cellophane or placing in an airtight container. 

These truffles also keep well and are perfect for keeping on standby for Christmas time guests.


All packaged and ready to be gifted. Happy festive baking xx

Thursday 17 December 2015

Are you dreaming of a (gluten free) White Christmas?

Here's an old Christmas favourite that is super easy to make, stores well, and can be whipped out in a moments notice when unexpected guests arrive. It also makes an excellent little home-made gift. Nothing says thank you like the time spent making a home baked gift.

Our Little Miss gave the White Christmas, some Chocolate Apricot Truffles and a few little gifts to all the lovely teachers and staff at Riding school. 

White Christmas Slice

1.5 cups rice bubbles - I used gluten free
1 cup whole milk powder
1 cup icing sugar
1 cup desiccated long thread coconut
half a cup red glace cherries
half a cup green glace cherries
half a cup dried cranberries
250g white vegetable shortening - I used Kremelta brand

Line a shallow 25 x 18cm - or similar size - slice tin with baking paper.

Put the rice bubbles, milk powder, icing sugar, coconut, chopped cherries and cranberries. 


Either in the microwave, or over a double boiler, gently melt the vegetable fat. Be very careful not to over heat it. A couple of 10 second bursts in the microwave followed by stirring until the last lumps melt is the ideal method. 

Stir the melted fat into the dry ingredients and fruit. 


Press the mixture into the lined tin, cover and place in the fridge until set. Allow it to come up to room temperature before cutting into petite squares. 


I packaged ours in cellophane bags ready to be parceled up with the other gifts. I used cute stickers to seal the bags. 

Sunday 6 December 2015

Tasty and Healthy Wholemeal Cheese Scones

I seem to be on a bit of a wholemeal crusade at the moment. I first made these for a work meeting - one of my colleagues is on a whole food diet. In reality it does none of us any harm to eat less refined food. The wholemeal flour lends a nutty flavour to the scones and compliments the cheese really well. The scones are just as light as the refined flour version. I made this batch for Little Miss to take to her riding teacher and all the staff at Arion Riding Centre today. 

Wholemeal Cheese Scones

2 cups wholemeal flour
4 teaspoons baking powder
half a teaspoon salt
1 teaspoon mustard powder
80g cold butter
2 cups grated cheese - loosely packed
1 egg - topped up with milk to make 1 cup of liquid

Preheat the oven to 200deg. C. and line a baking sheet with baking paper.

Mix the flour, baking powder, salt and mustard powder in a large bowl. 

Grate in the cold butter and toss with the flour to separate. Using your finger tips rub the butter into the flour mixture until it resembles bread crumbs. 

Stir in the grated cheese. 


Using a fork, mix the eggs and milk together. 

Make a well in the centre of the dry ingredients and pour in the egg mixture. Using a table knife, stir until only just combined. 


Tip the dough out onto a floured sheet of baking paper. Sprinkle the top with flour and press the dough into a rectangle about 4 to 5cm deep. 

Use a sharp knife to slice into squares, and transfer the scones onto the lined tray. 


Bake for 12 minutes depending on the size of the scones. 


They should be golden brown and sound hollow when tapped on the bottom. 


Our Little Miss, all ready for riding, and none too impressed I'm holding her up from getting to the ponies in the yard by taking her photo.  

The staff at Arion are always super grateful for home baking. 

Enjoy your week!