Thursday, 29 November 2012

Celebration Chocolate Cheesecake

All cultures and creeds from time immemorial have celebrated life's milestones with food. Banquets follow weddings, Christianity celebrates Christmas with a host of tasty treats, birthday's command parties and special teas, and christenings are marked with cups of teas and dainty cakes. This week we celebrated a dear colleagues 29 years of service to the school with a lovely dinner at our house. It was a wonderful informal evening of food, wine and laughter.
The man of the house cooked the main course of lamb, salmon, asparagus hollandaise and salads, and for dessert I made Pavlova and Baked Chocolate Cheesecake served with strawberries, cream and icing sugar.

This is the recipe for the Baked Chocolate Cheesecake:

Base
250g plain sweet biscuits
70g butter, melted
50g dark chocolate, melted


Base Method:
Crush biscuits to a fine crumb and mix in the chocolate and butter.


Press firmly into a well-greased loose bottom tin. Press up the sides of the tin. Chill.

Preheat the oven to 150deg. C


Filling
150g dark chocolate, melted
500g cream cheese
3/4 cups caster sugar
2 eggs
2 teaspoons cocoa
1 teaspoons vanilla
250g sour cream


Filling Method:
In the mixer or bowl beat the cream cheese and sugar. Add the chocolate and continue to beat to combine. Add eggs, then cocoa, vanilla and sour cream.


Pour into the shell and bake for 1 1/4 hours. Turn the oven off and leave the door slight open until the cheesecake is cold.


Chill until ready to serve.

Put the cheesecake tin on top of a small bowl and pull the sleeve of the tin down to release the cake. Now slide a spatula under the metal base and slip the cheese cake onto its serving plate.

If you can't face the idea of taking it off the base, just put the whole thing onto the plate.
Everyone will be so busy eating you wonderful dessert that they wont notice the base.

This was a great way to top off a lovely evening spent with friends.

Sunday, 25 November 2012

Crafty Little Clutch Purse

What better way to use up a few cotton furnishing fabric scraps than to make a natty little clutch purse. It will of course do equal duty as a pencil case if that's a more appropriate use for you. Clutch purses are a hot little trend currently, so why not sport your own bespoke version. Alter the size depending on your need. These can be made any size that matches a zip; and using any little bits and pieces of ribbon, lace or bias binding that happen to by waiting in your stash.

First measure out your purse.
The body should be the width of the zip, plus 1cm each side for seam allowance.
Be sure to allow enough depth, as the lining tends to make the inside of the bag smaller.

I used a 20cm zip, therefore my fabric measured 22 x 13cm.


Now choose the embellishments. The bias binding is good combination with the lace as the raw edge of the lace can be encased by the binding when it is stitched to the bag. I always decorate both sides of the bag.


Varying the stitches also adds interest to the design.


Now pin the right side of the zip to the right side of the fabric. Sew the zip using a zipper foot on the machine, so as to get close (but not too close) to the zip edge.


Zipper foot in action.

A really good tip is to start sewing with the zip head in the centre, then when you get close, stop, put the needle down, foot up, and then move the zip head back out of the way. This saves having a wonky bulge of sewing around the zip head.


Both sides of zip sewn in. Time to sew the lining to the inside of the zip.


Now place the right side of the lining fabric against the wrong side of the zip and sew into place.
The lining and main fabric can be sewed onto the zip in one step; however if your trying this for the first time I suggest doing them separately. Make sure the lining is facing the right way up once the bag is finished.


This is what the lining should look like sewn to the zip on the inside of the bag.


 New fold the layers together and sew the side and bottom seams of the bag. Be sure to unzip it before you sew, or it will be very difficult to get the zip undone from the wrong side!


Now stitch the bias binding onto the seam to cover the raw edges.
Clip the corners into rounds. Then sew the short edge of the bias binding to the seam.


 Fold the binding over the seam and ensure the long edge overlaps the sewn side. Carefully 'stitch in the ditch' from the right side, ensuring the underside is caught by the stitching.
This is quite tricky to say the least. If you find you have missed catching the long edge of the bias binding, then getting that quick-unpick moving is the only cure. If its proving oh-too-tricky, then there is no reason why it can't be hand stitched into place from the underside.


Turn it in the right way, zip it up and your done.

A cute and handy little clutch purse made for less than the price of a couple of coffees.


Monday, 19 November 2012

Goji Berry Bran Muffins

Nothing could sound more healthy than Goji Berry Bran Muffins. These are an accidental creation. The result of the best laid plans going slightly astray. A couple of weeks ago, seduced by the health claims, I bought a packet of dried Goji Berries. Lets just say, these are not the tastiest snack I've ever had; and since then they have been languishing untouched in the pantry. Last week one of my esteemed colleagues made the most delicious Bran and Cranberry Muffins for morning tea. Keen to get something in the cake tin after a busy weekend, I had an epiphany. Hoping that the whole might be greater than the sum of its parts, I combined the two. I was all set to make them, had the bran and the yoghurt, but then left the recipe at work. Not wanting to risk a disaster by guessing the ingredient quantities, I consulted a couple of recipe books, got the basic ingredient ratios and devised my own.


Goji Berry Bran Muffins

2 cups baking bran
2 cups flour
1 teaspoon baking powder
1 teaspoon baking soda
1/2 teaspoon salt
1/2 cup dried goji berries - soaked in hot water until soft
3 tablespoons golden syrup
1/2 cup oil
2 eggs
1 cup plain unsweetened yoghurt

Pre-heat the oven to 200 degrees C.
Combine the first 5 ingredients in a large bowl.
In a separate bowl combine the golden syrup, oil and eggs.
Gently stir the golden syrup mix, drained goji berries, yoghurt and dry ingredients together until just combined.


Bake in greased muffin tins for approximately 12 minutes. They should be golden in colour and bounce back when pressed.


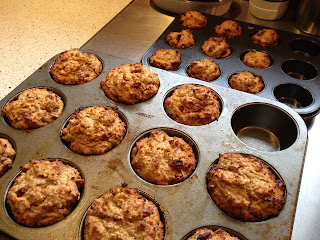
The recipe made enough for 12 medium sized muffins and 10 mini muffins.

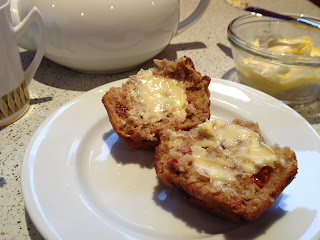
As you can see, two of the muffins have already been whisked away. Little Miss 3 insisted she have a 'special princess muffin' before bed. 


The berries add a nice touch of sharpness to the muffin, and the yoghurt makes them nice and soft. Overall the mixture isn't overly sweet; making these a perfect anytime snack.

Sunday, 18 November 2012

Christmas Bunting

The weather is warming, the holidays are tantalisingly close, the shops are full of chocolate and Christmas is definitely on the way. In an effort to depart from the usual array of plastic based bauble decorations, I decided to make some Christmas themed bunting. It is really easy to make and can be used year after year to decorate all sorts of places.

It only takes a few minutes to draw out a pattern to whatever size you require.

I made mine 18cm across the top and 21cm down each side of the triangle. 

A few scraps of Christmas fabric are all that's required. You can make your bunting as long as you wish using as many flags as required. I used nine flags for this one.


 This bunting is made from cotton fabric with a gold thread backing. 

I also cut out some other nylon and polyester mix fabrics to try out.
Gasp! I hear you say. Synthetic fabrics? Has she gone mad?
There is method in this particular madness... I wanted to be able to hang the bunting outside over the Christmas period without it deteriorating in the weather.


Having cut out all the flags, simply place the right sides of the fabric together and sew down each side leaving the top open.


Trim the tip of the flag as shown. This enables the flag to be turned in the right way and retain a nice sharp end.


 Use a pin to pick out the flag tip. Just be careful not to pull out any individual threads or push through the stitching.


 Once you have sewed all your flags, lay them out in the desired pattern. If your only making one string of bunting, it is a good idea to have decided on your pattern before starting the project. Because I was making a few strings at one time, I left the pattern arranging until all the flags were stitched. 


Now pin the flags to the ribbon. You will need 3 metres of 2.5cm width ribbon.

I left 35cm at each end for tying. Pin in the flag; then leave 8 cm in between the flags.

I have also used bias binding; it worked really well, but is not always available in a very large range of colours.


Fold the ribbon in half and sandwich the flag in between. Pin all the flags in place. Sew from the end of the tie, right through to the other end. Fold the raw edges of the ribbon in before you sew, so they don't end up fraying.


And it's made in no time at all! Not only is this bunting a lovely decoration for your home, it also makes a lovely home-made gift. It doesn't have to be a Christmas theme, and looks equally lovely in children's bedrooms and for party celebrations.

I am already thinking about what fabrics I could use for Little Miss' next birthday party.

Sunday, 11 November 2012

A Crochet Nana Blanket to Make Grandma Proud

Oh what dedicated women our forbears must have been. Its easy to forget that once upon a time, the only way to get most things was to make them yourself. Many skills now forgotten by the general populous were basic requirements for every household, and a matter of intense pride for those that mastered them. Every woman could knit a cardigan, darn a sock, crochet a blanket or sew themselves a stylish dress to wear to the town dance on a Saturday night. The skill of the crafts woman was evident in the clothes they and their family wore everyday, the furnishing of their home and the food on the table. There was no alternate place to source the basics of life. No high street shops or handy takeaways for those girls to turn to after a particularly hectic day. I am by no means suggesting we go back to that way of life. While it might sound distantly romantic, it was in reality just darn hard work for the average woman.

Now that most of the developed world has the benefit of an automatic washing machine, electric stove and other various assorted appliances, why not connect with social history and spend some of your spare moments indulging in an old fashioned craft?

See my previous blog for instructions on how to complete the Nana squares that are the foundation of this blanket. You can either plan the dimensions before hand, or just make as many as you feel like and decide on the size later. The choice of colours is completely optional. I chose to limit the colour palate and then randomly combine the colours of each square.
 
 
 Once you have all your squares, lay them all out in the required order. I arranged mine so no boarder colours repeated side by side. Time to get sewing...
The weather was so nice on Saturday I sat under the umbrella in the garden.
 

I used a simple lashing stitch to sew each square together using a wool darning needle. Use a colour that matches one of the squares. Start at one end of the blanket and sew around two or three sides of each square until most of the sides are connected. Then go back and sew up the odd ones that have been missed.

With all the sewing up completed, crochet a boarder around the outside. I used three rows of double crochet stitch - alternating the colours of each round. Be sure to crochet three extra stitches in the corner or they will curl inwards.
 
While this blanket was thrifty in terms of materials - using left over balls of wool and various oddments, it was labour intensive. The squares themselves are quick to crochet, but it takes quite a few to fill out a reasonable sized blanket. If you add up the number of squares x the time spent on each one the result might be surprising. The sewing up takes some time; however it's worth spending a little longer to ensure a tidy end product.
 
Good work Grandma. I'm not sure how you found the time to make whole bedspreads of squares; especially with the coal range to stoke, scones to make, lambs and chooks to feed, butter to churn, workers to feed and five children to look after.
 
And we thought we invented multi-tasking.    

Tuesday, 6 November 2012

My Lovely Year 13 Class


All good things must eventually come to an end, and today is the last day of High School classes for 2012's Year 13 girls.

Its time for them to make their own way in the world; to go off and live and laugh and cry as the Mercy women they have become.

Laughter and joy have always been a feature of life at our school, and this is my classes parting prank. They summons me away on pretence of needing to be seen by a member of senior management. This is what the room looked like when I got back! With all of them hiding in the store room. 

Thanks for a lovely year ladies. You are all wonderful, but I guess you knew that already!

Sunday, 4 November 2012

Delicious Afghan Biscuits

There is no more of a treat than a good old fashioned Afghan to nibble on with your afternoon cup of tea. With a busy week ahead, projects to mark and Faculty Meeting to arrange, I need a mass stash of nibbles to call on.

This recipe is from the old Edmond's Cookbook. In the new edition, some of the recipes have been changed in the name of reduced fat and sugar, so an old version is definitely worth hanging on to if you value the 'old fashioned' taste. I have converted the recipe to metric measurements. The following recipe can be successfully doubled:

Afghans
175g butter
75g caster sugar
150g flour
2 heaped tablespoons cocoa
50g cornflakes

Preheat the oven to 175deg. C
Cream the butter and sugar together until pale and fluffy.
Fold in the sifted flour and cocoa.
Stir in the cornflakes - I crush them first.
Either roll into small balls or pipe onto a lined oven tray.
Flatten a little and bake for 12-14 minutes. Allow to cool completely before topping with chocolate icing and a walnut.


I am always too impatient and time poor to roll the biscuits into balls, so always resort to piping the biscuits onto the trays.
Just make sure you crush the cornflakes or they get stuck in the end of the piping bag.


 Once you have piped them out, press each biscuit down a little. Use wet hands or the mixture will stick.


For the icing combine:
50g soft butter
approximately 1 cup icing sugar
1 heaped tablespoon cocoa
enough water to combine to a spreadable mix

Spread on each biscuit and top with a walnut.


 And now my friends, the day is done; time for a cup of tea, a sweet treat and a lie down.