Showing posts with label hand knitting. Show all posts

Wednesday, 16 April 2014

Button Cable Scarf

In the last few weeks I've been experimenting with a range of different yarns and scarf patterns. Hand knits are very much on trend this season, and my sister Charmaine is interested in some for her new signature boutique in Dunedin. Northern hemisphere trends have been leaning towards chunkier yarns and lots of stitch detail. Scarves are super easy to design given the repetitive nature of the pattern and fact that the width measurement is not particularly critical to the finished design. So why not give your own winter masterpiece a try!

Here is my first scarf sample: 4 cables with a moss stitch boarder and button and hole fixing.

I used approximately 150g of a 200g hank of chunky 14ply Naturally yarn and 6.5mm (Metric sized) knitting needles. 


New Zealand made of course.


Cable Button Scarf

Using 6.5mm knitting needles and 14 ply wool, cast on 30 stitches.
1st Row: Knit 1, purl 1, repeat until the end of the row
2nd Row: Purl 1, knit 1, repeat until the end of the row
These two rows form the moss stitch pattern. Repeat once more to form the end boarder.

First row of cable pattern: work 3 stitches continuing the moss stitch pattern.  

Now slip the next 3 stitches onto a cable needle. Place the cable needle at the back of the work. 


Knit the next 3 stitches from the left hand needle. 


Now knit the 3 stitches from the cable needle. 


This forms the cable: repeat the sequence 3 more times, then work the last 3 stitches as moss stitch. 


This is the finished cable row. 

2nd row: Work 3 stitches in the moss stitch pattern, followed by 24 purl, then 3 stitches of the moss stitch. 
3rd row: Work 3 stitches in Moss stitch, 24 knit, then 3 moss stitch.
4th row : repeat the 2nd row sequence
5th row: repeat the 3rd row sequence
6th row: repeat the 2nd row sequence

These 6 rows form the cable pattern. 

Repeat them until the desired length is achieved. 
I completed 24 sequences for this scarf.

Final moss stitch boarder and button hole:
Work 2 rows of moss stitch as per the first band. 
3rd row: work 4 stitches moss stitch, yarn over needle, knit 2 stitches together, then resume the moss stitch pattern to complete the row. work one more row moss stitch. Working the yarn over needle will form the button hole.

Last row: cast off in moss stitch. 

Sew the stray yarn ends in and sew the button onto the opposite side and end of the scarf; position it 5 cable sequences up from the end. 

Winter here we come. 

Happy knitting xx

Wednesday, 12 February 2014

Finally Finished - My Little Girl's Striped Colour Block Cardigan

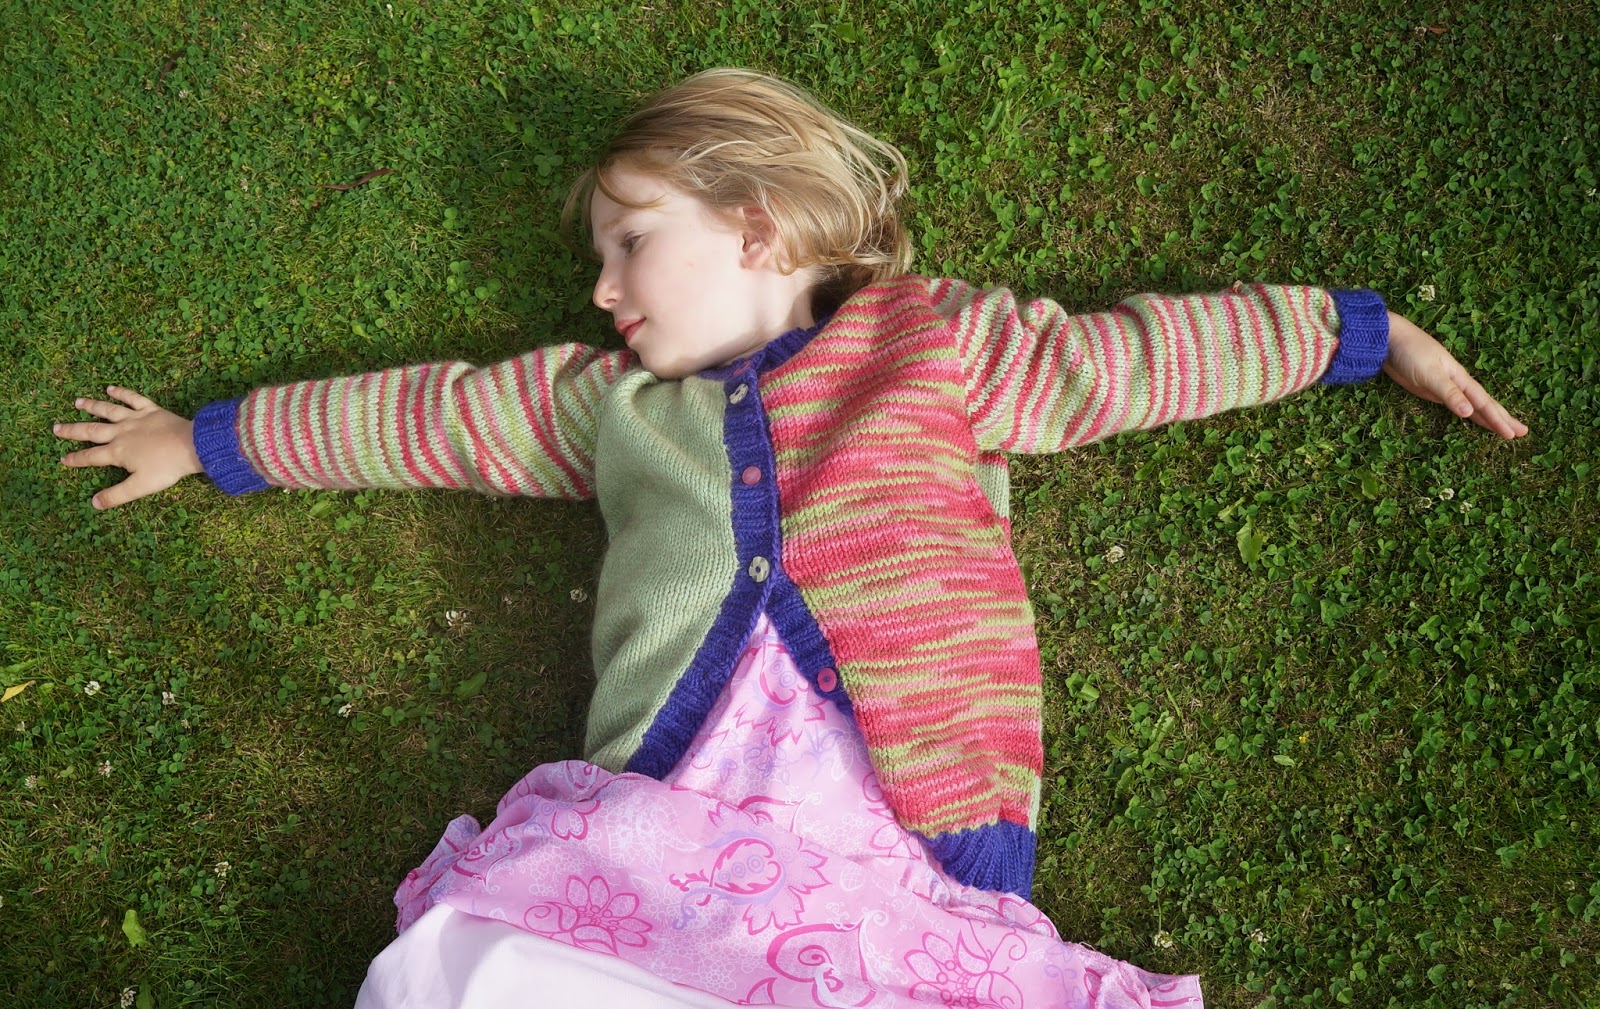
This one has been a long time in the making. Good thing I made a big size. Despite declaring she didn't like green, Little Miss almost 5 is now quite taken by her new cardigan. I think the proportion of pink was enough to win her over.


The pattern I used is a hybrid. The main pattern is  a Patons one from book 1253. But the colours and stripes are inspired by Sweden's Millamia designs. There combinations of colours, patterns and stripes is always striking: especially the Bright Young Things book (HCR Publishing, 2009). Unfortunately Millamia is all knitted on 3.25mm needles; all those extra stitches and rows take extra time that I don't ever seem to have.

I used this cardigan pattern in a size 6. It is knitted in double knit 8 ply on 4mm needles. The bands were knitted in a 2/2 rib on 3.25mm needles. As such, I changed the front band by casting the stitches directly onto the front and knitting 8 rows of 2/2 rib instead of knitting the band as a strip and sewing it on. 

I made the body of the garment about 2 cm longer to compensate for out long bean's extra height.

I used a combination of yarns: The variegated pink and green yarn are Utiku from The Wool Company. The Green yarn is a Shephard possum and wool blend, and the bands are Shephard lamb's wool. All are 8 ply and hand wash only.
The back of the cardigan is knitted as a repeated sequence of 10 rows green followed by 6 rows pink variegated. The sleeves are worked in 2 row stripes of the green and pink. The left front is all pink variegated and the right front is all green. Little Miss chose her own mixture of buttons from the stash she has been gradually whisking away from my craft draw. 

Our happy little girl wearing her new cardy. I wanted her to put a 'good dress' on to model it. She insisted on this vintage shopped number. She would wear everyday of the week if she could. 

Saturday, 13 April 2013

Striped Debbie Bliss Cardigan

I am a big fan of Debbie Bliss childrens' knitting patterns. They are designed to minimise the amount of sewing up required, and the sizes are deliberately generous to allow for lots of growing space.
True to form, I can never make anything exactly to the given plan. There is always room for a little inspiration and adjustment. This cardigan pattern comes from the Junior Knits book - Ebury Press, 2004. If you don't want to buy the whole book, the local library will probably have a copy you can borrow.
Although it is lovely, I didn't use the Debbie Bliss yarn. With the New Zealand exchange rate it's horrendously expensive to buy in this country. Instead I used Paton's Jet 30% Alpaca/70% wool, for the main pink colour - I know it's made in china, but I scooped up in a half price sale! For the stripes I used one of my favourite New Zealand made yarns: Shepherd 100% Lambswool Felted 12ply. It's a lovely soft yarn with great loft for a soft light garment. The 5mm needles make it quick to knit.
The cardigan is knitted in one piece, with increases and decreases for the sleeves. The original pattern was plain with a knit 2, purl 2 rib for the bands and cuffs. I changed it by introducing stripes to the body and ribbing, making the cuffs tighter, and the rib a plain knit 1, purl 1 pattern. I also made the body about 4 cm longer, as Little Miss 4 is a string bean, and there is nothing worse than putting in all this effort only to find it is too short.
I put the first lot of stripes across the back of the body and sleeves using a simple 2 rows of each colour with 2 rows of pale pink in between.
At the back of the neck the work gets divided into two to form each side of the cardigan. I worked each side separately until I got to the first stripe. By doing a step at a time it eliminated the need to do lots of row counting later to ensure the two sides matched each other.
Without the stripes I would have worked both side at the same time, but with three colours of stripe it was going to be too much of  tangle!
I broke off the yarn after the stripes were worked. All the working in of the ends is a bit of a chore, but worth it for the stripy result.
I didn't need the extra length of the circular needles to accommodate the ribbing for the neck and front band, as the bamboo needles were just long enough.
I deliberately put the darkest colour on the outside edge of the ribbing, as we all know how grubby they can get.
New cardy in action at the Pet Expo. Just what our little blossom needed in the cold wind. I'm working on a matching hat now.

Sunday, 30 December 2012

Two Little Knitted Birds

These two little characters would probably have looked equally good adorning our Christmas tree; however, the busy season being what it is, I only just finished sewing them up. The pattern comes from a book called Little Knitted Creatures by Amy Gaines (Leisure Arts: 2010) . The book has instructions for a whole variety of nifty little creatures. These birds come with a pattern for a bird house.
Instead of the bird house, I decided to give my two little tweets a twig to sit on. It was very quick and easy to make using an i-cord.
 I am not generally a huge fan of sewing up little fiddly bits of knitting; however these were, because of their small size and easy fit, very quick and easy to assemble. The top of the bird body is made in one piece, then the belly, and the two little wings. All the shaping is achieved by working invisible increases and decreases. Then you just sew up and stuff.
I sewed the wings on before the bird was stuffed, but I suspect it may have been easier after. Then it's just a simple matter of sewing on some eyes and a little felt beak.
The i-cord is very easy to make: cast on 3 stitches, knit the first row, then pass the stitches back onto the left hand needle and knit again. Repeat the process to effectively knit in a circle. Repeat until your cord is the required length. Towards the end of the 'branch' I reduced the stitches down to two and completed another few rows to make the branch look tapered on the end. I then cast on 3 stitches past way through the first branch to make another stick. Sew all the ends in using a darning needle.
I toyed with the idea of putting wire into the branch, but it wouldn't have stopped the birds from flopping over, so I abandoned the idea for now.
These little tweets are definitely worth trying as they are quickly constructed, a great stash buster of odds and ends of wool, and as cute as a button.

Saturday, 22 December 2012

Relaxing with my Knitting

One of the best things about knitting as a pass time is that it demands that you sit down and surrender to the rhythm and repetition of the stitches.  Knitting cannot be hurried and there are no real quick shortcuts to the end result. It is the opposite of instant gratification, and therefore, when given as a gift it is a true reflection of time invested in honour of another. In the case of this hat, that theory applies doubly as it is made from a mixture of wools recently spun.
We were lucky enough to have a few days of sunshine away at the family farm. In between the usual farm related chores: feeding the chickens, cooking the lunch, cutting up the mutton, chasing after errant sheep, seeing to Dad as he completes his tractor work and tending the garden, I found some time to sit and enjoy the day over a spot of Christmas gift related knitting.  
I used the wool I recently spun to construct this practical winter beanie. (See my previous blog: Homespun and Dyed)

This is the view from my chair on the veranda.

The wool is a thicker gauge than normal 8ply, so I used 4mm needles for the ribbing and 5mm needles for the stocking stitch. I included a section of pattern using some wool spun from a natural light brown coloured fleece.

This hat is a medium size. If you want a large men's hat just start with 100 stitches. A child's hat can be made with 80 stitches. As long as you use the stitches in multiples of 10 the pattern will always work. Just adjust the length accordingly.

Home Spun Hat

Using 4mm needles and light brown yarn, cast on 90 stitches. 
Rib knit (K) 1, purl (P) 1 for 6 rows.
Change to 5 mm needles and white wool yarn; work stocking stitch: 1st row knit, 2nd row purl for 6 rows.

Change to coloured yarn, leaving the white yarn attached, and complete 2 rows. 
Next row: work 1 stitch white, then 1 stitch brown: repeat until the end of the row. 
Following row: alternate white and coloured stitches to match the stitch before. Work 4 rows like this.
Break off the coloured yarn and continue to work stocking stitch until the hat measures 12 cm from the beginning ending with a purl row.


First decrease row:  K8, K2 together (K2tog). Repeat this sequence of 10 stitches until the end of the row.
2nd and every alternative row: purl until end. 
3rd dec. row: K7, K2tog. Repeat sequence until end.
5th dec. row: K6, K2tog. Repeat.
7th dec. row: K5, K2tog. Repeat.
9th dec. row: K4, K2tog. Repeat.
11th dec. row: K3, K2tog. Repeat.
13th dec. row: K2, K2tog. Repeat.
15th dec. row: K1, K2tog. Repeat.
17th dec. row: K2 tog. Repeat.
18th row: purl.
Next row: K2tog. Repeat.
Continue to K2tog on knit rows until 3 stitches remain. Knit a cord by passing the knit stitches onto the left needle and knitting through them again. Continue to do this until the cord is the required length.
I changed back to the coloured yarn to complete the very top of the hat.


Press the hat and then use a darning needle and mattress stitch to sew up the side seam. Tie in the loose ends. You can make the cord as long or short as you want. I have previously made them long enough to tie a knot in.
With the larger needles I had the whole hat knitted by bed time.What better way to spend a peaceful afternoon.

Tuesday, 2 October 2012

Cute Little Sprout Hats


There is something irresistible about little girls' clothes. All cute, pink and miniature. All innocence and joy. Even dirt looks good on them; and cake, especially cake, cheerfully smeared on faces and tops: "don't wipe your hands on your top. Poppa taught you that?"

Summer might be peeping around the corner, but these little hats are an addictive pass time. They are super practical, make great gifts, and are excellent stash busters. The generous shape means they are less inclined to fall from little heads, and they knit up in a flash. The cord on the top can be left short or knitted long and tied in a knot.

The sequence of the shaping makes it easy to adapt the size of the finished hat. Just cast on in multiples of 10 stitches. This one is knitted in 8ply using 3.25 and 4mm needles over 100 stitches. I have used the same pattern for thicker home spun wool using 4.5 and 5mm needles over 70 stitches to achieve a similar size product.

I got the wool from The Wool Company in Taihape. It's actually three colour ways knitted into a stripe: pale pink, pink and purple variegated and blue variegated yarn.


Little Sprout Hat - 8 ply yarn

To fit a large 2 year old or a medium sized 3 year olds head. If in doubt always go for the bigger size: you have put the effort into making it; you want it to last a while. 

Using 3.25mm needles cast on 100 stitches.
Rib knit 1 purl 1 for 8 rows
Change to 4mm needles, increase 1 stitch on the end of the first row, and work stocking stitch (1 row knit stitches, then 1 row purl stitches) for 11cm.

Shape Crown:
Row 1: K8, K2 together, repeat until the end, K1
Row 2 and every alternative row: purl
Row 3: K7, K2 together, repeat until the end, K1
Row 5: K6, K2 together, K1
Row 7: K5, K2 together, K1
Row 9: K3, K2 together, K1
Row 11: K1, K2 together, K1
Row 13: K2 together, repeat.
Repeat the knit together rows until 3 stitches remain.
Knit across the 3 stitches, then pass the stitches from the right needle to the left and knit across the 3 stitches again: effectively knitting them in a round. Repeat until you have the required length. Finish the cord by knitting the first 2 stitches together, knit the third stitch, pass remaining 2 stitches onto the left needle and knit together. Break the wool off, leaving enough wool to stitch the hat up if required, and pass the wool through the last stitch to finish.


I worked the following stripe pattern: 3 blue, 1 purple, 4 pink, 5 purple, 1 blue, 2 pink, 4 blue, 1 pink, 4 purple, 3 pink, 5 blue, 3 purple, remaining hat top rows are pink. 

Join the contrasting stripes on by tying the yarn onto the existing colour at the end of the row. Loosely carry the yarn up the side of the work, taking care not to pull it tight or it will distort the knitting.


Sew up the hat using mattress stitch. Take care to follow the row up the side of the knitting so the join is not visible.
The extra stitch on the end of the shaping makes it easier to sew the hat up without a visible seam in the crown. Thread the yarn at the top of the sprout down through the sprout and sew into the seam.


Sew all the loose ends in, and your finished!


The hat looks equally lovely in stripes or plain.
I usually don't bother to plan the strip in advance. Just choose the colours - an odd number allows you to knit single rows as the different colours can be joined onto both sides of the knitting - and go for it.

The variegated yarn makes the whole hat look random; whereas plain colours look more bold.


Happy knitting!