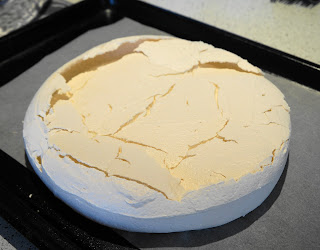
Pavlova is such a great kiwi favourite. It reminds me of hot summers, happy family times and Christmas' at the farm. As you all will be aware they are quite a tricky thing to get right, but there is usually no fault that can't be disguised with a generous slather of cream and a sprinkling of fruit. I made this one for a dinner party with friends. I have to confess that the previous one I made was rather last minute, and when the man-of-the-house needed the oven at a higher temperature it succumb to the heat and ended up rather flat! The great thing about pavlova is that, though the look may not be perfect, the taste is very forgiving. Pavlova
6 eggs - separated and at room temperature
a pinch of salt
1 1/2 cups caster sugar
1 1/2 tablespoons cornflour
1 teaspoon cider vinegar
1 teaspoon vanilla extract
Preheat the oven to 150 deg. C. normal bake setting. Line a baking sheet with baking paper.
 Carefully separate the eggs. A single speck of egg yolk in the white will stop them from fluffing up. Make sure the mixer bowl and whisk are spotlessly clean.
Beat the egg whites with the pinch of salt until soft peaks form. If they are over beaten at this stage they will appear dry looking and wont whip to full volume with the sugar.
 Combine the caster sugar and cornflour. Add this to the egg whites in 3 tablespoon lots, beating well in between each addition to incorporate the sugar.
Once all the sugar has been added beat for another 5 minutes. The sugar should be all but dissolved. Add the vinegar and vanilla and beat for a few seconds to mix.
 Pile the pavlova mixture onto the lined tray and smooth into a round disk. It important to build in plenty of height, as the pavlova will settle out in the oven.
 Place the pavlova on the centre rack in the oven and leave for 45 minutes before turning the oven temperature down to 100deg. C for a further 1 hour. Then turn the oven off and leave the pavlova in to cool.
It's a good idea to leave it overnight, just don't forget it's in there and turn the oven on again!
 If you can remove the Pavlova from the paper onto the serving plate then that's great, but if it looks like it will break up, then just put the whole thing on the plate and trim the paper accordingly. If you have pinking shears, they make a pretty zig-zag edge.
 Don't worry if the sides crack, just stick them back on and pile it with whipped sweetened cream and your choice of fruit. Raspberries are lovely in season, and kiwi fruit are a NZ classic.

The best part of the baking is of course, licking the mixer whisk afterwards.
I served the pavlova with a delicious raspberry puree. Little Miss 4 and her buddy loved the crunchy bits from around the outside the best!

No comments:
Post a Comment